Category: App Review

  • Guide: iPhone X like Swipe Up based Gesture on Android

    Guide: iPhone X like Swipe Up based Gesture on Android

    iPhone X like Swipe Up based Gesture on any Android phone or tablet. Navigation gesture on OnePlus and MI devices.

    We saw many innovative and popular smartphone in the year 2017. List of innovative smartphones cannot be completed without iPhones. In 2017, Apple released iPhone X with a lot of new innovative features. Features like Gesture-based navigation, Full-screen display, Face ID, etc are only available exclusively on iPhone X. Difference between ordinary iPhone and iPhone X is a home button. In iPhone X, Apple replaced the Home Button with Swipe Gesture Navigation. By swiping halfway up from the bottom to left-right of the screen you can control the phone. With the help of some Android apps, a user can try iPhone X like Swipe Up based Gesture on any Android smartphone.

    iPhone X like Swipe Up based Gesture

    How to get iPhone X like Swipe up based gestures on Android phone or tablet?

    Using third-party applications like Gesture Control

    iPhone X like Swipe Up based Gesture

    Gesture Control is one of the easy and lightweight Android application available on Play Store. It provides a lot of iPhone X like Swipe Up based gesture which can be used for navigation. Those gestures can be used to access Home Screen, Open Notification Panel, access Quick Settings, go back, access recent application, etc. This type of applications helps to operate a smartphone with a large screen. Gesture Control application can be configured as per the user’s requirement. On the big screen, it makes difficult to access notification panel by swiping down the notification bar from upside to down. But by setting iPhone X like Swipe up based gesture we can access notification panel instantly.

    Play Store Link of Gesture Control – Next Level Navigation

    Some of the iPhone X like Swipe Up based gesture which can be used on any android phone, tablet using Gesture Control Application.
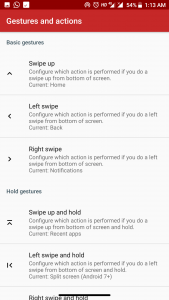
    iPhone X like Swipe Up based Gesture

    • Swipe Up
    • Swipe Left
    • Swipe Right
    • Double Tap
    • Double Tap and Hold
    • Long Tap
    • Swipe Up and Hold
    • Swipe Down and Hold
    • Swipe Left and hold
    • Swipe Right and hold
    • Swipe Halfway Up
    • Swipe Halfway Up and hold
    • Swip Halfway Up to Bottom

    Like Gesture Control Application there are Multiple Android applications available on Play Store which can be used to set up iPhone X like gestures on Android tablets and phones.

    How to use iPhone X like Navigation gestures on OnePlus 5T, 3T?

    One Plus started to roll out the beta version of Android Oreo for its devices. One Plus 5T and One Plus 3T are now getting updated to Oxygen OS based on Oreo. In that update, One Plus giving users the exclusive option to use iPhone X like gesture function instead of on-screen navigation keys.

    iPhone x like navigation gestures on OnePlus 3T, 5T:

    • Swipe up from the bottom-center area of the screen to go home
    • Swipe up from the bottom-left to go back or home
    • Swipe up from the bottom-right to go back
    • Swipe up and hold from the bottom-center to jump recent app list

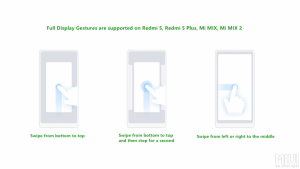
    How to Enable iPhone X like navigation gestures on MI, Redmi Phones?

    From the year 2017, We have seen many bezel-less smartphones like Mi MIX 1, MI MIX 2, iPhone X, One Plus 5T, Samsung Galaxy S8, etc. In the bezel-less phone, navigation seems more difficult as the user has to deal with larger screen size. Sometimes jumping from one application to another makes more difficult on full-screen displays. With the introduction of navigation gestures, it gets easier to navigate on full-screen smartphones. With the release of MI MIX and MI MIX 2, Xiaomi proved that they are more than a budget smartphone. Xiaomi smartphones are powered by MIUI. MIUI is known for its features and iOS-like user interface. After the release of iPhone X, Xiaomi announced that it will bring navigation gesture support to its Full-Screen smartphones. Now, MIUI 9 Beta version of MI MIX and MI MIX 2 coming up with iPhone X like navigation gestures. Xiaomi is also set to release Redmi 5 Plus globally on 14th February 2018. According to the latest news, Redmi 5 Plus will be mid-range full-screen size smartphone. MIUI forum is claiming that Redmi 5 Plus will support navigation gesture feature out of the box. Isn’t it a great news for MI fans?

    iPhone X like Swipe Up based Gesture

    If you want to use iPhone X like navigation gesture on your MI device then update your MI or Redmi device with latest MIUI Beta ROM. You can also check the status on Official MIUI Forum. Where you will get all news regarding features rollout and support.

    Did you already receive navigation gesture support on your device? Also, Write your opinion regarding gesture-based navigation on a smartphone in the following comment.

    Fix Instagram freezing issue on iPhone X.

  • SuperSU for Android instant Review with features

    SuperSU for Android instant Review with features

    What is SuperSU for Android?

    In last two guides, we discussed about Root. You can learn more about root from there. What To Do After Rooting Android Phones 2016 and Android Rooting For Beginners?. In this post we are going towards another app review. App which i am going to told you is most important app for rooted users. You can’t imagine rooted phone without SuperSU for Android application. Today, I am going to told you about “SuperSU”.

    SuperSU for Android

    Why SuperSU for Android is so important?

    After rooting your android device you must use that root permission so wisely. It can damage your phone too. So, It is important to manage the applications who are using Root access. There are lot of applications who can break device’s security using root access. It can harm your Android device. It can brick your device. So, How to prevent rooted device from bricking? We require something which can manage those root permission. Fortunately, there is one application which helps user to control Root permission. Thanks to Chainfire Developers. This app is called as ‘SuperSU’.

    SuperSU application helps user to control root permissions. When any application wants root permission then SuperSu application shows pop-up notification about it. You can grant or deny root permissions to respected application. SuperSU app monitors all applications who are using root privileges. With the help of SuperSU you can anytime grant or deny root permissions. Most important feature of this application is that it is free for everyone. And it has active community which always works on it to make it better and better everyday. Don’t worry about root permissions install SuperSU for Android device right now.


    Features of SuperSU:

    • It keeps track of applications which has granted root permissions.
    • When you run SuperSU for next time it helps user to automatically grant those permissions again.
    • Keeps complete log of applications which granted root permission.
    • You can monitor how frequently those applications use root permissions.
    • SuperSU can temporarily unroot your device.
    • Helps to troubleshoot issues if your phone is stuck in boot loops.
    • Also works in recovery mode.
    • You can also lock SuperSU application using PIN code. This requires you to buy pro version of application. It will cost you nearly $3.
    • OTA survival mode.
    • Full color-coded command content logging. Different colors for input/output/error.
    • Per-app logging configuration
    • Per-app user override
    • Per-app notification configuration
    • Deep process detection
    • Works when Android isn’t properly booted
    • Works in Ghost Mode
    • Convert to /system app
    • Complete unroot
    • Support to CyanogenMod ROMs
    • Personalization options:
      • Icon can be changed including invisible option
      • Different Themes

    Review of SuperSU:

    There is no doubt about usefulness of SuperSU. Is it really worth? In straight word yeah it is worth to use SuperSU application on rooted device. User interference of application is simple and easy to understand. Most important thing is you can download and install it without any cost. It is free for all. If you want some extra features then i suggest you to go for PRO version of SuperSU. Download link is given below. Grant or Delay function is quiet easy. In addition with permission control, SuperSU also keeps an extensive log of all root permissions. You can also remove root functions temporarily on one click. PRO version helps device to quickly re-rooted after an OTA (Over-The-Air) update. Overall SuperSU for Android is great application.

    Download SuperSU free version

    Download SuperSU PRO

    Developer Chainfire

  • App Review of ViPER4Android Best Audio

    App Review of ViPER4Android Best Audio

    ViPER4Android Total Review

    From Custom ROMs to Font, Android gives us best ride of personalization power. There are lot of ways to personalize Android experience. You can bend Android OS to suit your liking. There are no limitation to it. It doesn’t matter you need Root access to personalize. Without Root access user can personalize his device by changing the launcher, layout, the icons, folders, fonts and keyboard. Android is not limited to only UI customization. On Android you can improve the audio experience. ViPER4Android is one of the best audio driver available in the market. You can enhance audio experience of your device by using ViPER4Android application. If you have fond of music then, ViPER4Android is perfect application for you. It offers enhanced experience in audio quality especially for wired audio. In this post we are giving you hands on app review of ViPER4Android.

    App review of ViPER4Android
    ViPER4Android best

    You know audio enhancement tools like Beats and Dolby. Some HTC and Lenovo devices comes up with Beats and Dolby Music systems. They gives you enhanced audio experience. Want to enhance audio experience of android device? ViPER4Android is perfect for you. It helps to enhance audio quality of the device. Here, you don’t need to buy HTC or Lenovo devices. Any Android user can use this app to enhance the audio experience of device. This things makes ViPER4Android one of the leading audio enhancement tool.


    App review of ViPER4Android

    Features of ViPER4Android:

    • USB/DOCK Audio Output Support
    • Spectrum Extension
    • AnalogX
    • ViPER-DDC
    • Channel Pan
    • Speaker optimizations
    • Sound Fidelity Control
    • Virtual Headphone Surround+
    • Support IRS modules for various effects
    • Different MOD support
      • XtreamBeats
      • S-Force Surround 3D
      • Beats Audio
      • WavesMaxx Audio
      • Dolby Digital and Dolby Atmos
      • Am3D Ziren Audio FX
      • maxxAudio


    How to install ViPER4Android in easy steps on Android Device:

    1. ViPER4Android requires root access to use. Device must be rooted. Without root you can’t install ViPER4Android on your android device.
    2. Before, installing ViPER4Android remove other Audio Mods installed on your device.
    3. Install BusyBox on your Android device. BusyBox helps device to run UNIX commands. It helps to install ViPER4Android driver on android device. Download BusyBox.
    4. First Download ViPER4Android and Install it on your device.
    5. After Installation completion, run ViPER4Android from app drawer.
    6. When you will run the app, it will ask you for root permission. Grant the root permission for ViPER4Android with the help SuperSU. Prompt YES to install ViPER4Android drivers on your device.
    7. After completion on Driver Installation reboot your device.
    8. When the device has rebooted, launch ViPER4Android application from app drawer.
    9. Click on the 3-dot menu button on the top-right of the application.
      Check Driver Status of the application. It should display Normal Status.

    This way you can install ViPER4Android on your Android device.

    Best Review of ViPER4Android

    ViPER4Android is app which completes your audiophile wishes. It has only one issue that you can’t run it on non-rooted android device. Otherwise, ViPER4Android is best application. It comes with support of different Mods means you can use Dolby, Beat technology on your device. It helps to enhance the audio experience on your device. Its spectacular functionality helps user to play enhanced sound on speaker, headset, Bluetooth speaker and USB dock also. Some devices may face battery draining issue.

    ViPER4Android just require proper guide to install it on your device. To protect your device from boot-loop issue always follow proper instructions before installing ViPER4Android. Never install ViPER4Android if your device is not in the list.
    This is our App Review of ViPER4Android. Give your feedback about ViPER4Android.

    Developer Website

    Founder Euphy Wong

    Co-Founder Jasper Loo


  • Xposed Framework Install Guide

    Xposed Framework Install Guide

    How Xposed framework works?
    How to use Xposed installer on Marshmallow device?

    If you want to modify system files or customize Android resource file then i will suggest you to use Xposed framework. Why to use Xposed framework? When we use Xposed installer it only require root access from device. Root access is sufficient for Xposed framework to tweak Android operating system. It makes Xposed framework far better than Custom ROMs.

    Xposed framework is capable to handle multiple modules which helps to turn up android device into a powerful customization machine. When you apply any module from Xposed installer. Application only rewrites the system code with applied module code. This module code is responsible for any changes happening in the system. Modification are done on the system memory. This makes Xposed framework easy-to-use tool. When user disable any module then exciting code is restored by default script. This makes system files as it is. User can easily Enable and Disable those modules with the help of Xposed installer application. This is Why Xposed framework is more preferable than Custom ROMs.

    How to use Xposed Installer on any Android powered device?

    Follow the following procedure to apply or use Xposed framework on any Android powered device:

    1. While working with Xposed framework most important step is to take a full backup of your device. You can take backup from Recovery menu. You can also use third-party applications like Titanium Backup, etc.
    2. Next step your device must be rooted. If your device is not rooted, then Xposed framework will not work on your device. Root access must available on your device before proceeding. If you don’t have a rooted device, then you can’t use Xposed Installer application on your android Phone or tablet. Root your android.
    3. If you are unable to use Xposed framework on your android device, then make sure that your device running on minimum Android 4.0 Ice Cream Sandwich version. Because, Xposed framework doesn’t support device which are running on Android version below 4.0.

      Xposed Installer only supports Android device which are running Android version 4.0+

    4. After fulfilling all the requirement required to run Xposed framework on your device. Now, you are ready to install Xposed Framework on your android device.
    5. You can download the latest Xposed framework installer app from here. After downloading the APK install it properly.
    6. Now, launch the Xposed framework Installer app from app drawer.
    7. Click on Framework, and wait until framework completes its installation by itself. After completion of installation reboot the device.
    8. Open the Xposed framework application.
    9. If application showing device ready pop-up then you can install different modules on your device. This will help you to start customizing your device.

    How to install an Xposed Module on any android Phone or Tablet?

    Xposed modules comes in form of normal APK file. This makes Xposed module easy to install on any android device. User can download and install different modules from Xposed installer app. Xposed installer app features a hundreds of modules in download section. For example, to install modules available in the Xposed Installer app just follow following steps:

    • Open the Xposed Installer application.
    • Go to the Download section.
    • From long list of available modules. Select the module which you want to install. You can check each and every module with a description written there.
    • Download the selected module and install it.

      install xposed module on android
      Install Xposed Framework Module on Android Phone, Tablet, etc.

    For example, there is “3dot Menu Mod” module which adds three dots option bar in the menu. Select it and after downloading it enable that module from Modules section. Done after Rebooting you can observe the changes.

    How to install third-party modules in Xposed framework?

    • Android user can also install third-party modules from different sources.
    • User have to install those modules like normal APK files. After installation user needs to enable that installed module from Xposed Installer application.
    • Every time you install different module you have to enable it from available modules option by selecting it.


  • What is Xposed Framework?

    What is Xposed Framework?

    What is the best way to tweak Android Operating system?

    There are lot of ways to tweak behavior of Android Operating system. Though Android is known for its customization potential. Non-root Android devices are not able to customize system files. Device which are not rooted needed to use different widgets and launchers to customize UI of the system. But, if user want to customize his device by changing attributes of system files in that case he needs root access on his device. With the help of root access user can improves or expands the potential of Android device. It gives you the ability to modify the system files of the Operating System. By flashing a Custom ROMs and Recoveries, user can modify each and every aspect of Android OS.

    Xposed Framework and its advantages

    Xposed is a Framework. It is used to apply different modules on Android operating system. This modules modifies the system attributes without disturbing or touching any System files and application. Different modules can be applied with the help of Xposed application. These modules are responsible for change in the behavior of the Android system. Xposed supports different versions of Android Operating system and ROMs. Xposed application makes modules easy to apply. User can undo applied changes with just one click. This functionality makes Xposed framework easy to use.

    Why to use Xposed framework? How it is better?

    Sometimes it is risky and complex procedure to unlock the device and then flash the Custom ROM on device. If device is not flash properly then it can lead device to brick condition. It will be so easier if we are able to modify system files just with ROOT permission. All credit goes to developers of Xposed Framework. Xposed require only root access to customize Android Operating system. It is simplest way to customize user experience of Android.


    One of the best way to tweak Android operating system is to use Xposed framework.

    Advantages of Xposed Framework in Android?

    Why Xposed framework is easy to use?

    When we install Xposed Module is applied all the changes are done on the memory. Default script is replaced with modified script. When we deactivate that module all changes applied on the memory are removed. Original script is restored on the memory. So, Simple. Rebooting the system user can get back to the original state of the system. This is one of the advantage of Xposed Module over Custom ROMs.

    With Xposed Framework user can make changes in Android system without flashing/installing a Custom ROM.
    Another advantage of Xposed framework is that it supports multiple modules threading. Those multiple modules can do changes on the same part of the system.  No need to combine different modified APKs.

    Most important question

    Where can I find different Xposed modules?

    You can download Xposed Modules from download section of the Xposed Framework Application. You need to just browse the module you want to apply.

    Download Option in Xposed Android Application
    Xposed Application Download Menu

    Xposed framework is lot better than flashing a ROM on Android device.

    The Xposed module also allows user to remap Android devices hardware buttons. If you are using a device which lacks of dedicated camera key, then with the help of Xposed Framework user can turn a volume rocker button into a dedicated camera button to capture images. It will solve many issues like How to use volume button to capture Images?

    It not ends here you can also use Volume button as a Power key also.

    Advantages of Xposed in Android Operating System.

    Learn How to use Xposed Framework on Android in simple steps.

    Click Here to Download Xposed Framework Installer for Android 2016