Author: Saurabh Patil

  • How to Unlock Bootloader On Any Android Phone, Tablet Device?

    How to Unlock Bootloader On Any Android Phone, Tablet Device?

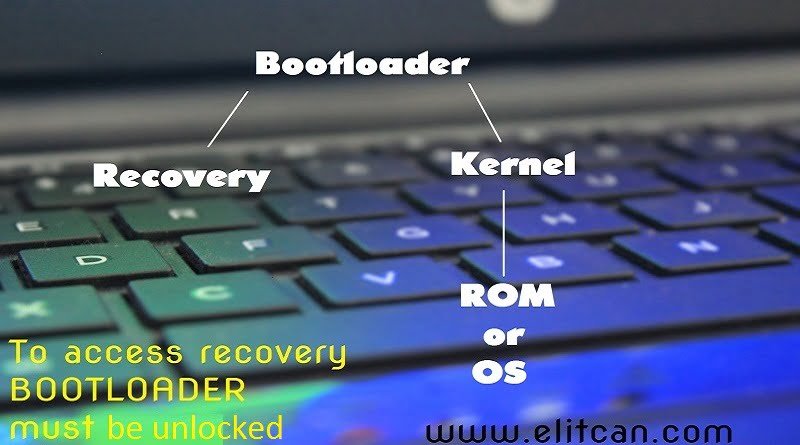
    There are two types of Android devices in market. Some of them come up with Stock Android version known as Android Vanilla Devices and another group of devices known as Layered Android Devices which come up with forked android version like HTC Sense device, Samsung Galaxy devices, Xiaomi devices which runs on MIUI ROM. Android devices which are running on Stock Android Operating system comes up with less number of modifications in android operating system from manufacturer. Bootloader of this type device can be unlocked easily. NEXUS and MOTOROLA devices comes up with stock android feature. Generally, all the devices come with locked bootloaders but we want to test the limits of android then its required to unlock bootloader.

    Please note that this method is only applicable for devices running on STOCK android version.

    Everything about unlocking Android Bootloader
    unlock android bootloader

    How to Unlock bootloader of NEXUS 4, 5, 5x, 6, 6p phones?

    1. Download and install Android SDK from “developers.google.com” on Computer.
    2. Now, after installing Android SDK switched off your Android device and boot into fastboot mode. NEXUS devices can be boot into fastboot mode by pressing one of the following key configuration:
      (a.) Press the power button and volume-up button until device boots up into fastboot mode.
      (b.) Press the volume-up, volume-down and power buttons until fastboot mode gets displayed.
      This method is mostly used for old NEXUS devices.
      (c.) Press the volume-down and power buttons for 10-15 seconds.
    3. Try one of the configuration mentioned above to enter into fastboot mode.
    4. Now, Connect your device to your Computer with the help of USB Cable.
    5. Wait for a minute until all drivers get installed on your PC.
    6. Open Command Prompt on your computer (MAC/LINUX users open Terminal from menu).
    7. After opening Command Prompt, Type following command to unlock the Bootloader of the Android device:
      fastboot oem unlock
    8. After pressing enter there will be a pop-up showing prompt regarding confirmation of unlocking bootloader of device.
    9. Read all the instructions carefully. Confirm your choice by pressing volume up button/power button.
    10. Now, Bootloader of your Android device is unlocked successfully.

    How to unlock bootloader of Non-Nexus or any other devices like Moto G phones, Micromax, LG, etc.?

    Some manufacturer of Android devices allow user to unlock bootloader. Whereas some manufacturer doesn’t give permission to user to unlock bootloader of device. Depending on the manufacturer of phone and model unlock state of bootloader changes. Manufacturer like XIAOMI, SONY, HTC provides unique code to customer so he can unlock the bootloader of the device. This unique code can be acquired from official web site of respected device.

    Unlocking bootloader enables you to install custom recoveries like TWRP, CWM, etc.

    How to unlock bootloader of Sony Xperia Z, Z1, Z3, l, m4 aqua, m dual, etc. phones which has unique unlock ID?

    If you have unique unlock ID given by manufacturer, then you can unlock your device by simply following steps:

    1. Get unique Unlock code from manufacturer. If you don’t have Unique Unlock ID, then it can be acquired from official website of device.
    2. KEEP BACK UP
      While unlocking the device to protect the data, user must keep Backup of all data present in the device.
    3. Enable USB debugging option from Setting menu of the device.
    4. Install the Android SDK and device’s Drivers on your computer.
    5. Also, Install ADB (Android Debug Bridge) software on your desktop. It can be found in SDK files.
    6. Open the platform-tools folder from Android SDK folder.
      Click “Shift + Right click” and Choose option “Open a Command Prompt Here”.
    7. Now, switch off your device and boot device into fastboot mode.
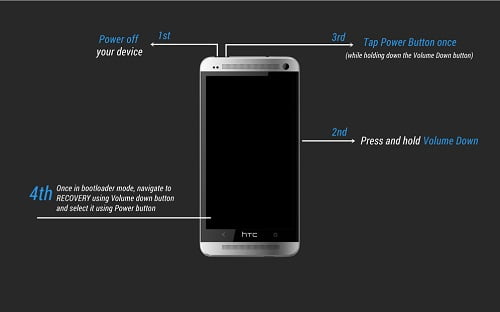
      To boot device into fastboot mode hold the “Power” and “Volume Down” buttons for 10 seconds. After 10 seconds release those buttons, and you can see your device is booted into fastboot mode.
    8. Run command:
      adb devices
      Above command will help device to recognized.
    9. Now, Connect your device to PC with a USB cable.
      Run command fastboot oem unlock UNIQUE_KEY. Unique key is provided by manufacturer
      After running the command, device will show pop-up about confirmation of unlocking the device. You must confirm this using Volume keys that you want to unlock your device.

    This way Bootloader of Android device can be unlocked in simple method.

  • What is Android Bootloader Mode? What does it Do? Why its Locked?

    What is Android Bootloader Mode? What does it Do? Why its Locked?

    Many times you must heard about the word “Android Bootloader” while rooting your Android Device device. On many tutorials and guides you can find out a note written there.

    “Please, unlock device’s bootloader before Rooting or flashing Custom ROM on it”

    What is a Bootloader?

    Bootloader, as name suggests “It is a code that helps to load Operating System while Booting the system.” Another definition of Bootloader is “It is programming code which gets executed before any Operating System runs”

    Bootloader is very processor specific code of motherboard which boots before any software runs on device. It is a package of instructions which makes operating system kernel boot before any software runs on device. Every bootloader comes up with different modification and debugging environment according to the manufacturing company of the device. All electronics devices like smartphones, Personal Computers, Microcontrollers comes with Bootloaders. It resists user to flash any custom ROM on device.

    What Does Android Bootloader Do in phones or other android devices?

    Bootloader is extremely important part of electronics device which founds in every motherboard. It is some sort of instructions which helps to boot operating system and kernel on the device.

    How Android Bootloader Works in phones, tablets, etc. devices?

    Android is an open source operating system which gives lot of freedom to developers. Due to openness Android Operating System has huge number of users. It makes manufacturers to develop their own Bootloaders according to the hardware present in the device. Bootloader works like control system in Android which gives instructions to kernel of operating system to boot operating system normally.

    Why Bootloader Is Locked?

    While manufacturing the device, manufacturers take lot of efforts in designing of Android OS. Lot of extra features are added in that newly designed Android OS like Xperia devices comes up with STAMINA mode feature which helps to increase battery life of the device. While selling those devices manufacturers wants customer must be stick to their designed Android OS rather than flashing any third party Custom ROM. To avoid that unnecessary software flashing Android OS powered devices comes up with locked Bootloader. Locked Bootloader of device helps to avoid flashing of third party Custom ROM on device. That’s why Android OS powered devices comes up with Locked Bootloader.

    Why To Unlock Bootloader of Android Device?

    Android bootloader
    Where is Android Bootloader

    When bootloader of device is locked it is impossible to flash any Custom ROM. If user tried to flash Custom ROM by unlocking bootloader of the device, then manufacturing company voids device warranty. Forcing device to flash Custom ROM may brick your device. That’s why there is always a notice written “Please, unlock the Bootloader of the device before rooting and flashing any Custom ROM on it.”

    Bootloader is a program which loads Operating System with Kernel. If you want to flash custom ROM on your device, you need to install/flash custom recovery on your device. Which is not possible without breaking the lock between Bootloader and Recovery. That’s why user must unlock bootloader of device before flashing any custom ROM and Kernel. If you are connected to PC or computer, to exit from bootloader mode, simply plug out the USB cable and you are done!

  • Android Recovery Mode Options Explained Well

    Android Recovery Mode Options Explained Well

    What are Stock, Custom Android Recovery Mode Menu Options?

    Android System Recovery Mode Options can be used to fix the system without accessing Operating System. This options are so useful if you wanted to work on Android development. Recovery mode options changes from manufacturer to manufacturer. Common recovery mode menu options in stock as well as custom recoveries in android device are as follows:

    Stock Custom Android Recovery Mode Options Explained in Details
    Android Recovery Mode Options
    1. reboot system now: This mode is used to restart the device in Normal Mode. This options is available into every stock as well as custom recovery.
    2. apply update from ADB: ADB which is called as Android Debug Bridge. Android Debug Bridge is used to connect device to Computer. With the help of ADB option device can be controlled right from Computer using commands. This option is used by developers to test different applications and to fix bugs present in the applications. Packages stored in Computer can be install on android device with the help of ADB bridge.
    3. apply update from external storage: Many times while flashing custom ROMs and Recoveries it is inconvenient to use ADB bridge. To tackle this problem this is another android system recovery mode option which is used to flash Custom ROMs, packages and Recoveries. Using “Apply Update from external storage” option user can flash different ROMs and recoveries from external storage. In that case, files which are needed to flash are stored on external storage. Save the files which needed to flash on external storage and boot the device in recovery mode. Select the option “Apply Update from external storage” and select the file which have to flash. And wait until process completed and reboot the device from recovery option. Especially if you are using custom recovery rather than flash one, you’ll find this option very helpful if you want to try new ROMs every now and then.
    4. wipe data/factory reset: Wipe data option is used to reset the device. If you are facing lag in your device and feeling lot of bugs in your system, then you can fix it by selecting this option. This will delete all stored data in device. This option can be accessed through device’s setting option. If your device is unable to boot or if your device is locked out, then it then it can be fix by “Wipe Data/Factory Reset” option.
    5. wipe cache partition: This is one of the best Stock and Custom Android Recovery Mode Options which will make your device faster. Wipe cache partition option is used to clear temporary files. If your device is not working properly then it can be fixed using Wipe cache partition option.

    Additional Android Recovery Mode Options

    Here are some additional Android recovery menu options explained that you may find in Custom recoveries.

    1. Fastboot mode: Fastboot mode allow user to flash firmware directly from the PC. Custom Recoveries comes up with fastboot mode option in the recovery.
    2. backup and restore: Using Backup and Restore option user can backup current ROM on which device is running. When you want to Backup all of device data then you can select this option. It will backup all data on SD CARD in .img file. And using Restore option you can restore your saved data in that .img file.
    3. wipe dalvik cache: Dalvik is a java based VM (Virtual Machine) which is the base of your running apps. In order to make access times faster i. e. to open and operate them faster, the dalvikcache is used instead JIT (Just In Time) compiler.
      Wiping dalvik cache will also make your device faster but unlike wipe cache partition option, you won’t have to setup your apps again.

    Its better to wipe dalvik cache once in a while.

    Do you know more options? Comment below.

  • How To Enter  Recovery Mode in Android? Boot to recovery?

    How To Enter Recovery Mode in Android? Boot to recovery?

    What is Recovery Mode in Android Phone?

    Recovery Mode is used to fix the system issues without interrupting Operating System. Every android system comes up with in-built recovery mode. Learning how to Enter Recovery Mode of the android system is more important if you are going to work on android development. To Boot into Recovery Mode of the android system you must know some little things about how recovery works.

    get into android system recovery mode
    Enter into HTC Android Recovery Mode

    How to Enter  Recovery Mode in Android?

    Every android device is nothing but a bunch of a hardware on which a sweet layer of Operating System is filled. Operating system works according to the support of Hardware utilized in the system. There are some switches placed on the hardware which works to trigger the functionality of system. For Example: Volume Rocker Buttons, Power ON/OFF Button, Camera Key, etc. When user clicks this switch it works like an interrupt signal to the system so that system can work on that function immediately. Means when you click power On/Off button system goes into Switched On/Off mode without thinking anything.

    This way in android devices those switches comes with multi-functionality pins means power ON/OFF button can be used to switch ON/OFF device and also can be used to boot device into SAFE MODE and it can be also used to take screenshot of the screen. User can boot up device into SAFE MODE by holding power ON/OFF button for a while. Same way Recovery mode works in the android system. When you press some sort of keys combination, system immediately Enter Recovery mode instead of Operating System.

    For most of the recent Android phones, tablets, devices press, Volume Up, Volume Down and Power Key at once to boot into recovery mode while device is powered off.

    This is the beauty of the android device. Those keys combination decided by the manufacturer of the device. For example, some Samsung devices Enter Recovery mode when Power button and Volume down Button is pressed for a specific time whereas Motorola devices can be boot up in Recovery Mode by pressing Power Button and Volume Up button for a specific time. This keys combination is decided while manufacturing device. So, it changes according to device and model number of device.

    Why phone’s touch touch screen is not working in recovery mode?

    You must know that recovery mode is different from the operating system. There is no connection between system Recovery Mode and Operating System. When you are in the Recovery mode you are on the different track. Most of Recovery mode doesn’t support touch screen functionality to navigate menu. There is a reason for that thing it is more convenient to use Recovery mode with Hardware keys than touch screen capability. It reduces the chance of accidental touch on the screen. Recovery mode is more sensitive to command. Some wrong commands and operation can make your device brick. Today there are many custom recoveries which comes with touch functionality. Hats off to developers!!

    enter into recovery mode
    Recovery Mode Screen

    Some key combinations to put phone in recovery mode

    1. Volume Up Button + Power Button
    2. Volume Down Button + Power Button
    3. Volume Down Button + Power Button + Home Key (Old Samsung devices)

    • Keep these keys in pressed mode for a while until device logo boot into Recovery Mode.
    • Now, you can see recovery mode on the screen.

    This way you can access Recovery of the Android device.

    Stuck in recovery mode android? Exit

    If you are stuck in recovery mode then you can exit it by simply turning off the device via power button or removing the battery. Next time you boot your device, it will boot the regular OS installed.

  • What is Android Recovery Mode Used For? What is it?

    What is Android Recovery Mode Used For? What is it?

    What is Android System Recovery Mode in Android Phones? & What does it do?

    Recovery, it is one of the important part of android system. Things like flashing the operating system and drivers are not possible without recovery. You cannot flash or install bootable files on your android system without getting into Recovery mode. Recovery is one of bootable partition of the system memory which separates operating system from boot codes. Boot codes are those codes which controls the boot menu of the system. Even for rooting your device, you may have to enter into recovery mode.

    Simplest meaning of android recovery mode is “It is one of the feature of Android System where user can access various features like fastboot mode, wipe data/cache mode, factory reset device, system partition, install android packages without accessing the system’s operating system.”

    Android Recovery Mode Use, How to Enter, Purpose, Stock Recovery, Custom Recovery
    Android Recovery Mode

    What is Android Recovery Mode Used For? What’s the main function?

    Recovery is one of the integral part of system’s operating system. It helps users to repair operating system’s installations and also used to install Official Operating system updates given by OEM companies.

    Most important feature and function of Android System Recovery Mode is to fix the system without touching the Operating system.

    What is the use of Recovery mode in android system? What does it do?

    Few years before back, mobile handsets were so simple to handle. Use of those devices was only limited to the voice calls and text messaging. On such devices it was very difficult to modify, update and delete the system software and firmware of the system. Today we are using mobile handsets with increased capability in term of performance, feature and lot of new things. But with that improvements it also come with increased complexity in the architecture and manufacturing of the device.

    Android Operating System needs repairing functions like fastboot mode, wipe data mode, wipe cache mode which helps to tweak and repair software issues of the system. User can also Backup and Restore the system from recovery mode of the android. We can access all those modes from the recovery mode of the android system. User can also find out important information of the device in that mode.
    Android is famous for its openness. Recovery is the best example of this. We can customize those recoveries according to our need.

    How to go into Android Phone, Tablet or any Device Recovery Mode?

    get into android system recovery mode
    Enter into HTC Android Recovery Mode

    Every android system comes with accessible bootable partition where important source codes are placed which is Recovery Mode. Android system can be boot up into recovery mode by using two ways which are as follows: –

    1. User can Enter Into Android System Recovery Mode with the help of keys/buttons which are there on android handset. By pressing specific keys combination android boots up into recovery mode.
      For Example: – In some of Motorola Devices when you press Power Button + Volume Up button for a 20-30 seconds you can enter into recovery mode of android. Note that every device comes with different keys combinations to access recovery of android system.
    2. Another method to access recovery of android by using different command lines provided by companies. USB debugging feature must be enable to access recovery mode with the help of command lines.

     What is Stock and Custom Android Recovery?

    There are two types of Recoveries we can use on the Android OS.
    1) Stock Recovery (comes in-built in most of the devices)
    2) Custom Recovery (Customizable Recovery)

    The stock recovery comes in-built in the android device. It has limited number of features given by manufacturer where as Custom recoveries like CWM (Clock Work Mode), TWRP Mode are customizable. Custom Recovery use to flash different custom rom on the Android device.

    Before experimenting with any other custom recoveries, make sure you have image of stock recovery of your device.

    What is the use of Custom Android Recovery?

    • The main purpose of Custom Recovery is to format all the user data and files present in the system.
    • Custom recovery is also useful to install official operating system update.
    • User can upgrade and downgrade the operating system version with the help of Custom Recovery.
    • Backup and restore functions can be used from the recovery mode of the android.
    • Recovery can be used to install apk packages on android which are not signed by official sources. User can install unsigned application packages with the help of recovery mode on android.
    • User can do partition of the internal memory with the help of recovery.

  • What To Do After Rooting Android Phones 2016

    What To Do After Rooting Android Phones 2016

    Which things can you do after Rooting Android Smartphone in 2016 & later?

    This post is the answer of the question that you must have got, “Rooted Android Now What“. We’ve recently written post about Android Rooting for Beginners. If you don’t know about Android Phone Rooting, then you can read it here. After rooting your android device user can do lot of stuff which are not accessible in unroot mode. Here are 13 things you can do after Rooting android phone in 2016.

    rooted android now what
    Things to do after rooting android phone 2016
    1.  Many android devices come up with lot of unnecessary pre-install applications which used to eat up lot of RAM and Memory. We cannot remove those applications easily. Those Unwanted stock applications which come pre-installed in the device are called as a BLOATWARE. We cannot remove those applications unless we have root access. After rooting your android device user can clean up all the bloatware from the device. It helps to increase the internal memory of the device.
    2. You can speed up your android device by increasing the clock speed of processor which is called as Overclocking of android. It helps phone to perform faster. It also requires Root access.
    3. Same as Overclocking to increase battery stamina of your android device you can decrease the clock speed of processor which is called as Under clocking of android. Due to reduced clock speed processor eats less juice from your battery and it helps to increase battery stamina of your device. But, due to Under clocking the performance of your device gets affected.
    4. If you have a device with low internal memory. Then with the root permission you can increase the internal memory of your Android device by removing unnecessary pre-installed applications and by installing all of your applications on External Memory.
    5. One of the most important thing you can do after rooting is to increase the RAM of your Android device. If you increase the RAM, you can speed up your Android device. There are lot of methods to increase the RAM of your android device.
    6. There are lot of applications like System Tuner, Super user, Tasker, Root Explorer etc. Those applications require root permission to run. To run such types of applications your device must be rooted.

      Do not root if you don’t have stock ROM and stock recovery.

    7. To Back up all of your applications and data requires root access. If you have rooted device, then you can backup all your entire device.
    8. To install Xposed Framework and its modules.
    9. Most of the freeware android applications comes with unnecessary Ads. By rooting your android device, you can not only block ads but also pop up in browsers.
    10. Mostly all android devices come with screenshot functionality. But, so few of them can record screen. With help of root access and some third party apps user can record screen too. Isn’t that great.
    11. You can customize theme of your android. It includes everything from home screen to battery and signal color.
    12. You can also flash Custom Framework (Custom ROM) on your device.
    13. It gives ability to use different recoveries like Custom, TWRP, CWM, etc.
  • Android Rooting For Beginners?

    Android Rooting For Beginners?

     What is Rooting Android Phone? Means? Purpose to Root Phone?

    Root word has two meanings one of them is basic source, cause or you can say origin of that things and another one is it is one of the part of plant which helps plant to attaches it to ground. 

    android rooting for newbies, beginners
    Android Rooting For Newbies

    Same meaning of root is there in android smartphone. Simply, Android Rooting means running your android device (Phone, Tablet, PC, Phablet, etc.) with full system access. Rooting means unlocking the potential of operating system so you can customize your device according to you without any obstacle. After rooting your android device, you can install unapproved applications, update or replace the OS or firmware, overclocking and under-clocking of the processor and you can personalize user interface (UI) of your device. Even completely change Look N Feel of your smartphone.

    In Windows it is referred as a ‘ADMINSTRTIOR USER’ where in Android it is ‘ROOT USER’

    Smartphone which runs on Android Operating System requires access to view, to modify, to delete the system files and settings. With the help of that root access user can also control the permissions of device which gives you seamless access to device.  If user wants to modify such things from device then he requires a permission (i.e., root access). It gives ability to modify system files, applications and settings. Those abilities are inaccessible to normal Android user. That’s why one who with root access is ‘SUPERUSER’. As Android Operating System also uses Kernel of Linux. It is nearly same like as LINUX based operating system.

    As a living being who has super power called as SUPERMAN.

    User who has root access is called as SUPERUSER.

    Android Rooting SuperUser
    SuperMan is SuperUser


    Why to Root Android? Purpose of Rooting Android Phone?

    Most important thing mobile companies doesn’t provide root access because of security threat to user privacy. Android comes with some security system which separates each and every application from another. When you root your android device you breach that security. It may cause some serious damage to your operating system and your privacy. That’s why when you root your smartphone you void your warranty of your device. Exceptions are the companies like YU, which encourage users to root their Android Smartphones. Rooting YU phones doesn’t void the warranty.

    Why Android Rooting Void Warranty?

    When you root your android device you remove all restrictions required to safeguard your device. Means you are exposing your device to malware. Exposing device for malware means you are infected. It may lead to bricking of your device. To protect from that threat mobile companies don’t provide root accessibility.

    After rooting your device, you can modify the system files without any restriction. User can also delete critical system files. Which will lead to serious problem. Smartphones are not easy as desktop so you can re-install android. To protect user from deleting system files root permission is not permitted from manufacturer.

    That’s it for today. Let us know how did you find first post on elitcan.com? Do you like it or not? Let us know your thoughts in the comment section below.