Author: Saurabh Patil

  • App Review of ViPER4Android Best Audio

    App Review of ViPER4Android Best Audio

    ViPER4Android Total Review

    From Custom ROMs to Font, Android gives us best ride of personalization power. There are lot of ways to personalize Android experience. You can bend Android OS to suit your liking. There are no limitation to it. It doesn’t matter you need Root access to personalize. Without Root access user can personalize his device by changing the launcher, layout, the icons, folders, fonts and keyboard. Android is not limited to only UI customization. On Android you can improve the audio experience. ViPER4Android is one of the best audio driver available in the market. You can enhance audio experience of your device by using ViPER4Android application. If you have fond of music then, ViPER4Android is perfect application for you. It offers enhanced experience in audio quality especially for wired audio. In this post we are giving you hands on app review of ViPER4Android.

    App review of ViPER4Android
    ViPER4Android best

    You know audio enhancement tools like Beats and Dolby. Some HTC and Lenovo devices comes up with Beats and Dolby Music systems. They gives you enhanced audio experience. Want to enhance audio experience of android device? ViPER4Android is perfect for you. It helps to enhance audio quality of the device. Here, you don’t need to buy HTC or Lenovo devices. Any Android user can use this app to enhance the audio experience of device. This things makes ViPER4Android one of the leading audio enhancement tool.


    App review of ViPER4Android

    Features of ViPER4Android:

    • USB/DOCK Audio Output Support
    • Spectrum Extension
    • AnalogX
    • ViPER-DDC
    • Channel Pan
    • Speaker optimizations
    • Sound Fidelity Control
    • Virtual Headphone Surround+
    • Support IRS modules for various effects
    • Different MOD support
      • XtreamBeats
      • S-Force Surround 3D
      • Beats Audio
      • WavesMaxx Audio
      • Dolby Digital and Dolby Atmos
      • Am3D Ziren Audio FX
      • maxxAudio


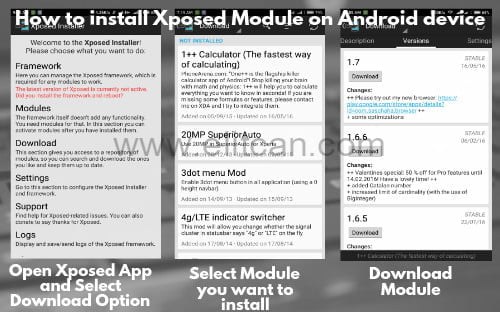
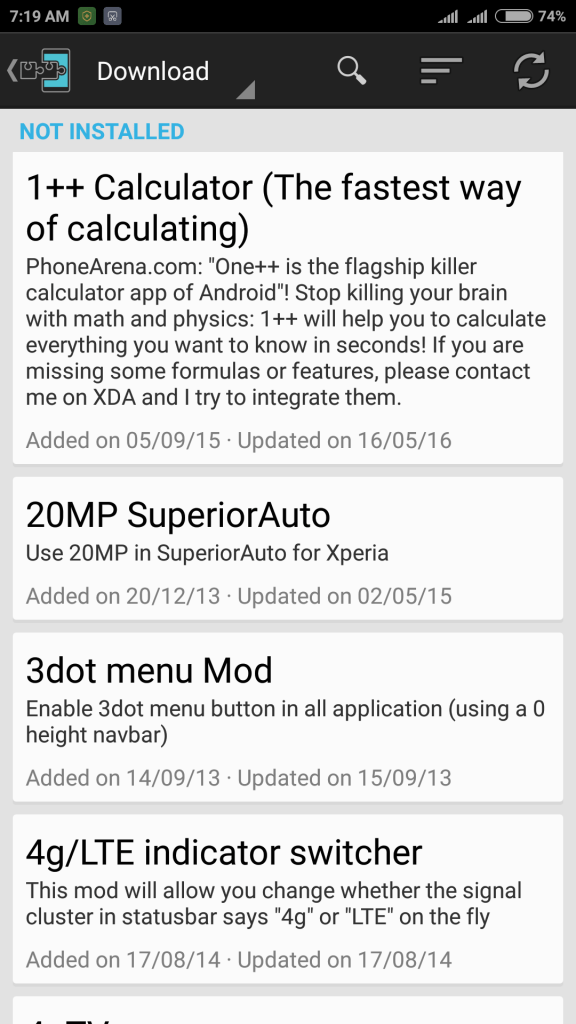
    How to install ViPER4Android in easy steps on Android Device:

    1. ViPER4Android requires root access to use. Device must be rooted. Without root you can’t install ViPER4Android on your android device.
    2. Before, installing ViPER4Android remove other Audio Mods installed on your device.
    3. Install BusyBox on your Android device. BusyBox helps device to run UNIX commands. It helps to install ViPER4Android driver on android device. Download BusyBox.
    4. First Download ViPER4Android and Install it on your device.
    5. After Installation completion, run ViPER4Android from app drawer.
    6. When you will run the app, it will ask you for root permission. Grant the root permission for ViPER4Android with the help SuperSU. Prompt YES to install ViPER4Android drivers on your device.
    7. After completion on Driver Installation reboot your device.
    8. When the device has rebooted, launch ViPER4Android application from app drawer.
    9. Click on the 3-dot menu button on the top-right of the application.
      Check Driver Status of the application. It should display Normal Status.

    This way you can install ViPER4Android on your Android device.

    Best Review of ViPER4Android

    ViPER4Android is app which completes your audiophile wishes. It has only one issue that you can’t run it on non-rooted android device. Otherwise, ViPER4Android is best application. It comes with support of different Mods means you can use Dolby, Beat technology on your device. It helps to enhance the audio experience on your device. Its spectacular functionality helps user to play enhanced sound on speaker, headset, Bluetooth speaker and USB dock also. Some devices may face battery draining issue.

    ViPER4Android just require proper guide to install it on your device. To protect your device from boot-loop issue always follow proper instructions before installing ViPER4Android. Never install ViPER4Android if your device is not in the list.
    This is our App Review of ViPER4Android. Give your feedback about ViPER4Android.

    Developer Website

    Founder Euphy Wong

    Co-Founder Jasper Loo


  • Introduction on Development in Android Edition

    Introduction on Development in Android Edition

    What means Development in Android?

    Most of the Android user now knows about Root, ROM, Kernel, Boot-loader,etc. Earlier years, seen was different. Android device was not so handy like today. One from ten person used to come up with smartphone. Small children wanted to grow up fast so, they can have their own mobile phone. But, Today it’s not like that. Age doesn’t matter for smartphone. Now, Everyone has a smartphone. And lot of people are coming out for development in Android. That’s a good news.

    Things have changed.

    We are now living in a society where progress and development is important. Due to vast availability of smartphones and Internet now 80 percentages people know about Root, Kernel, Boot-loader like terms. Lot of people have shown interest in those things. Number of young fellows are choosing this as a career option. Those all things affecting on our life so much. We will call it as “MOBILIZATION”. Its nothing but globalization of mobile industry.

    Before 3-4 years ago, for any small thing we have to be dependent on mobile companies or shop. But, now things are changed. Every possible solution to any threat comes from developer first then it comes from Company. Every house has at least one developer who knows how to deal with those things.

    As a development how many days you are going to use resources from others. True developer is who try to design and build things differently. In this section we are going to guide you on different development sections.

    How to develop? What you should do?

    From Internet you have probably seen a large number of ROMs, Applications which are built from different sources. Many people know about ROM and how to flash it? But, why so less number of geeks are there who wanted to develop their own ROM. There are some methods of ROM developing which are unknown to us.
    This section aims to guide you on Android Development. We will start from basics to Advanced.

  • Guide for Beginner Titanium Backup Application

    Guide for Beginner Titanium Backup Application

    Titanium Backup Complete Introduction

    Backup is not the new thing for us. We are using backup feature from our Nokia Era. Nowadays backup is not the only thing which is important. Device must be able to restore data. Backup helps device to recover from a system failure. So, you must backup your important data.  There are lot of methods to backup data from your phone, tablet device. You can take backup using Third-Party application. Titanium Backup is one of the top backup application available in the market. It require root access to work. In this guide, we are going to introduce you with Titanium Backup Application.

    taitanium backup review
    Introduction, Feature and Review of Titanium Backup

    Why every Android user must try Titanium backup Application?

    In Android development, We need to backup data every time. It helps us to flash ROM or Recovery on Android device safely. It reduces the bricking possibility of device. There are different ways to take backup on Android phone.

    1. From Setting Menu
    2. Using Cloud Service
    3. From Recovery Mode
    4. Using Third-Party Applications

      From above all methods, best way to take backup is to use Third-Party Applications. User can backup and restore data easily using Third-Party applications. Titanium Backup Application comes under this category.

    What is Titanium Backup? How to use Titanium Backup on any android phone and tablet device?

    Titanium backup is one of the most famous backup application available in the market. Using this application you can backup different types of data. Want to backup game data on android device. Using Titanium backup application user can backup application and game data on the device. This makes you to back up your progress in the game as well. This application is able to restore all your backup data on the device. This features makes Titanium Backup application unique.

    Important things to remember,

    Titanium Backup require root access to run on Android device.

    After flashing ROM, Never attempt to restore system apps or data of another ROM. It will cause serious crashes on the device.


    Top 9 things which can be done using Titanium Backup Android Application:

    What is the use of Titanium Backup Application?

    1. Perform Complete backup of device:
    2. Create a recovery backup (.zip file):
    3. Scheduled backup:
    4. Restoring from backup:
    5. Managing bloatware: 
    6. Move backup files from Phone to PC or PC to Phone:
    7. Move applications to the SD card:
    8. Cloud backup feature:
    9. Send backup files to Google Drive and Drop Box:

      Best Review of Titanium Backup Application

    If you want to backup your device then, Titanium Backup is perfect solution for you. It makes quick backup on device. Quickly transfers backup files with PC and Online services like Drive and Drop Box. To use advance features you may need to update app with PRO version. It comes up with two version free and pro version. You can download and install both applications from Google Play Store. This app is designed specifically to take backup of data. It is simple and quick to use Titanium Backup application. New users may feel some issues regarding User interface of application.

    It is complicated to understand functions of Titanium Backup. It will be easier to understand working of Titanium Backup application if you have knowledge about Root and Recovery things. It allows you to send backup files to another network easily.

    Design and Interface: It has a poor interface. It doesn’t make application worst. After some hands on you will be able to understand each and every feature of app. Most of the features are in Batch Option. It makes interface of batch options somehow crowded. The only drawback that we can see is in interface. Sometimes, you need to do lot of handwork to understand application. As you use Titanium Backup Application more you understand it more and more. There is no reason to avoid use of application only because of interface.

     I think Titanium Backup is a perfect backup solution that will appeal to many Android Developers largely.

    Download Titanium Backup Application

  • Instant way to get OTA upgrade of Android N on your Device Beginners

    Instant way to get OTA upgrade of Android N on your Device Beginners

    What is Android N?

    Android Operating System is heartbeat of most of the smartphone. Last month Google announced next version of Android ecosystem. Android N is code name of upcoming Android Operating system. Name of Android N is yet to be decided. All Android devices are going to update to Android N in coming days. Android N is in news nowadays due to its extensive support to Virtual Reality. Google has unveiled lot of new features in it. It comes with lot of new features. Some of the features of Android N are split-screen multi-window mode, Doze Mode and improved notification shade. Those are the top features of Android N.

    update android in simple steps
    Update your Android Phone to Android N

    Google started to release update of Android N from 9 March 2016. It was the first developer preview of Android N. Android N is going to release in five builds. Those builds are steps towards the stable build of Android N.

    Complete shedule of Android N upgrade plan is given as follows:

    1. First Developer Update of Android N: March 9, 2016
    2. Second Developer Update of Android N: April 13, 2016
    3. Third Developer Update of Android N: May 18, 2016
    4. Fourth Developer Update of Android N: In Mid-June 2016
    5. Fifth Developer Preview of Android N: July 2016
    6. Final Android N AOSP (Android Open Source Project) build will be out in August or September Month.

    Precautions to take before upgrading device into Android N version

    Before updating your device into Android 7, you must follow precautions strictly. It reduces bricking possibility of device. For safe use of Android N those precautions are recommended.

    1. Precaution No. 1
      Always take backup of your whole device. Because, build that you are going to flash is in development mode. It can erase all of your data while upgrading process. Therefor, take complete backup of your device. You can take backup from Recovery Mode or by using different applications like Titanium Backup.
    2. Precaution No. 2
      Up-gradation process takes lot of time. So, Charge your device completely before upgrading. Up-gradation time differs from device to device.
    3. Precaution No. 3
      Make sure your device has sufficient storage available. Those are some of the Top 3 precautions should be take care before upgrading Nexus devices on Android N.


    How to get Update of Android 7.0 on Android Phone?
    Firmware update to Android N.

    Before you upgrade your Android Phone with latest build of Android Operating System. You must follow each and every precaution given to you. Install Android N on your device in 3 simple steps.
    Update your Nexus, Sony devices to newest version of Android in 3 steps

      1. Step No. 1
        Check that your device is supported or not for Android Beta Program.
        List of device which supports Android N.

        Device which are going to update to Android N.

        1. Nexus 6
        2. Nexus 6P
        3. Nexus 9
        4. Nexus 9G
        5. Nexus Player
        6. Pixel C
        7. Sony Xperia Z3
        8. Nexus 5X
        9. Android One General Mobile
          If you have above device then you can upgrade your device Officially to Android N.
      2. Step No. 2
        Enroll your device into Android Beta Program. Without Android Beta Program your device will not receive regular OTA update of Android N builds. It is mandatory to all users to enroll into Android Beta Program if you want to get Android 7 update right now.
      3. Step No. 3
        After joining Android Beta Program, you will be able to receive over-the-air(OTA) update of Android N. Just refresh your updater application. Upgrades of Android N will be downloaded automatically on your device shortly.
        This is the simplest way get instant update of Android N on your device.
  • Guide What is Brick and Why Android gets Bricked

    Guide What is Brick and Why Android gets Bricked

    What does it mean when Android gets Bricked?
    Define Bricked Android Tablet.

    What means BRICK to you? Brick means simply a rectangular block made of a clay. Block which never responds to any action. This state is called as a Bricked state. This saying is used largely in technology world. Brick word is used to refer a electronics device when it stops working properly. In that post, We are going to answer you all the questions about bricking of phone, tablet, etc. After reading that you will be able to understand Why Android gets bricked? What to do if you have a bricked device, and How you can avoid bricking of android phone and tablet?

    meaning of bricked android device
    Why Android Phone, Tablet gets Bricked?

    In android, Bricking is a condition. Condition of a device when device didn’t works properly. Many times Android phone, tablet, etc. never responds. They takes long time to respond. In that case, Many people refer their device by different name like useless piece of stone, block, etc., etc. If you are wondering Why android phone, tablets are compared to brick then you will get answer here. There is strong possibility that BRICK word has come in Android dictionary from day-to-day examples like above.

    Bricking refers to a Electronic Device which has stopped working. Because of damaged firmware or hardware.

    It happens because of corrupted firmware or damaged hardware present in the device.

    When Android Phone or Tablet can’t function properly or it fails to power ON. Then, it is called as a Bricked Device.

    Types of Bricking in android phones 2016:

    According to the device’s ability to function bricked devices are classified in two types.

    1. Hard Brick
      What is Hard Brick means?
      Many times Android phone, tablets fails to power up properly. Then it is called as a Hard Bricked device. In that case device never shows any vendor logo while booting.
    2. Soft Brick
      What is Soft Brick means for beginners?
      When Software error makes device unusable then Android phone, tablet is called as a Soft Bricked. Soft Bricked device shows problems like Boot loop or freezing of device during boot.

    Why Bricking of android device can’t be fix easily?

    There are some reasons behind it. We are not able to fix bricked android device so easily. Android devices are not like as Computers. Bricked Computers are easy to fix as compared to android device. Because, after bricking on computer you can install another operating system. But, It is not same for Android phones and tablets. You can’t install another operating system on mobile phones so easily as like as Computer. That’s why fixing bricked android device is complicated.


    Why android devices get bricked?

    How to identify your android gets bricked?

    There are many reasons which leads android phones and tablets in a bricked condition. To avoid these condition users must know about potential reasons behind it. Top general reasons for any soft bricked android smartphone.

    • When user tries to Overwrite Device’s Firmware:
      While overwriting or flashing newer or older version of firmware on the android phones and tablets there is lot of possibility of bricking the device.
      Never install firmware which is not supported to your device.
    • Avoid installation of low-level and unsupported system software on your device.
    • Due to some physical conditions like power failure.
      While updating firmware if device loses power then there is chance of failure in system. It happens because of half-overwritten system files. And half-overwritten firmware can not function properly on device. This may lead your device in bricked state.
    • Avoid virus and malware in the system. Virus and malware has a potential to damage system files. It can brick android phones and tablets.
    • Don’t interrupt device while updating firmware procedure is ongoing. Interruption can corrupt firmware data. This may lead to device into bricked state.
  • What is ROM used for in Android and its Types

    What is ROM used for in Android and its Types

    What is ROM?

    Everyone knows ROM as a Read Only Memory. In Android ROM has another meaning “ROM is a software which runs on Android device.”
    Why different android device comes up with different UI? Today, there is a wide range of Android devices in market. You can buy android devices from Samsung, Sony, HTC, Xiaomi, etc. manufacturers. Every different device comes up with different Android experience. Samsung Galaxy devices comes up with Touch WIZ UI where Xiaomi devices has its own MIUI interference. When you pick up an SONY smartphone, user interference is different than a Samsung smartphone. That’s because every manufacturer develops their own Android code by tweaking it. This makes different User Interference in different Android devices. Now, Question remains about Android ROM.

    what is android rom and its types
    ROM and it Different Types

    What is Android ROM? Which are the different types of ROM?

    ROM is Operating System of you device which is stored on Read Only Memory.”

    Android ROMs are of two types: 

    1. StockROM: In a simple language Stock ROM is defined as a software which comes on your device when you buy it. It is Android Operating System which manufacturer provide you along with your device.
    2. Custom ROM: Custom ROMs are build by developers. How Custom ROMs are developed? Custom ROMs are developed by modifying source code of Stock Android, adding extra features in it, and building newly developed operating system images for Android devices.

    There are number of communities which develops different ROMs. They try to improve Android experience by adding extra features in it. Some of the top Android ROM developing communities are mentioned below. Top 5 ROM for Android.

    1. Cyanogen Mod:
      CyanogenMod is also known as “CM”.
      It is one of the most popular and successful Android ROM. From last 5 years, CyanogenMod is most popular Android ROMToday, Cyanogen is not only a ROM it is a fully-blown company which produces software. CyanogenMod is supported by various companies like OnePlus, Lenovo and YU. Devices from those companies comes up with preloaded CyanogenMod ROM. CyanogenMod is famous for its theme engine where user can apply different themes on just a click. It gives user a flawless experience of customization.

    Beginners Guide to flash CyanogenMod on Android 

    1. AOKP:

      What is AOKP ROM in Android?

      AOKP is also known as “Android Open Kang Project”. It is an open source Android ROM. AOKP ROMs are developed by forking the source code of Android. Some of the special feature like Vibration Pattern, Ribbon, Navigation Ring, LED Control, etc are added in that source code. This way AOKP ROM gets developed.

    2. AOSP:
      AOSP ROMS are based on Stock Android. They are inspired from vanilla android hence they are called as “Android Open Source Project”. It allows user to alter the source code of stock Android according to the need. Using source code of AOSP number of Custom ROMs can be build.
    3. Paranoid Android:
      Also knows as “AOSPA”.
      It is a Custom ROM aims to enhance the beauty of Android. This ROM follows the same portfolio of Google. It comes with tons of easy-to-use features like Hover Control, Pie launcher,etc.
    4. PAC-ROM:
      Every PAC-ROM includes features from different ROMs. Mostly it comes up with combination of CyanogenMod, AOKP and Paranoid ROMs.

      Name of PAC-man ROM is inspired by yellowish guy from video game “PACMAN”.


    Why to install Custom ROM on android device?

    If you are using Non-Nexus device, then it takes lot of time to get latest Version of Android Operating System. To tackle this problem user can flash latest version of Android Operating System with the help of Custom ROMs. Custom ROM replaces existing device’s Android operating system version with newly built ROM. This is the most popular reason why people install a custom ROM?

    What are the benefits of Custom Android ROM?

    List of Benefits of Custom ROM
    Benefits of Custom ROM

    There are lot of benefits of using Custom ROM on Android Phone, Tablet devices. Some of the Top benefits of Custom ROM are as follows:

    • Free the Bloatware present in the device:
      Sometimes we face lot of lag while using Android device. It is due to presence of unwanted application on Android device. Those unwanted application uses more RAM and Memory. It makes Android phone, tablet slow. These unwanted applications are called as “Bloatware”. Bloatware can be removed by flashing bloat free ROM on Android device.
    • Increase RAM of the device:
      It helps to free up more RAM on your device. By removing unwanted applications present on Android device.
    • Install Android application on External Storage or Move application on External Storage:
      One of the important feature of Custom ROM is to install application on External Storage. If you are using Stock ROM. Then, it is impossible to move application on External Storage. By moving application on External Storage user can increase the internal memory available on the device.
    • Install Ported application:
      You cannot install another device’s application on your device. But using Custom ROM you can install different device’s applications on your Android device.
      For Example: WALKMAN music player is only supported to SONY Xperia devices. But, using Custom ROM user can install and use this application on any Non-Sony devices. 

      How to improve battery life of Android device easily?

    • Improve Battery life of the device:
      Many Custom ROMs gives user different option to configure clock frequency of processor. By adjusting clock frequency of processor user can increase Battery Life of the Android Phone or Tablet.
    • Flash or Update device with newer version of Android:
      You can flash newer version of Android Operating System in the form of Custom ROMs.
    • Personalization:
      Using Custom ROM you can personalize user interface of your Android device. Custom ROM comes up with lot of personalization options.
      Want to enjoy MIUI interface on your Android Phone. Just flash MIUI Custom ROM on your device and enjoy MIUI on your Android device.
    • Use extra feature:
      Many Custom ROMs comes up with feature like Theme Engine, Overclocking, Private Browsing support, battery saver and so on.
    • To improve performance of the device:
      Custom ROMs allows user to remove unnecessary files present in the device. By removing those files user can improve performance of the Android device.

    Those are the some of the benefits of Custom ROM on Android System.

  • Xposed Framework Install Guide

    Xposed Framework Install Guide

    How Xposed framework works?
    How to use Xposed installer on Marshmallow device?

    If you want to modify system files or customize Android resource file then i will suggest you to use Xposed framework. Why to use Xposed framework? When we use Xposed installer it only require root access from device. Root access is sufficient for Xposed framework to tweak Android operating system. It makes Xposed framework far better than Custom ROMs.

    Xposed framework is capable to handle multiple modules which helps to turn up android device into a powerful customization machine. When you apply any module from Xposed installer. Application only rewrites the system code with applied module code. This module code is responsible for any changes happening in the system. Modification are done on the system memory. This makes Xposed framework easy-to-use tool. When user disable any module then exciting code is restored by default script. This makes system files as it is. User can easily Enable and Disable those modules with the help of Xposed installer application. This is Why Xposed framework is more preferable than Custom ROMs.

    How to use Xposed Installer on any Android powered device?

    Follow the following procedure to apply or use Xposed framework on any Android powered device:

    1. While working with Xposed framework most important step is to take a full backup of your device. You can take backup from Recovery menu. You can also use third-party applications like Titanium Backup, etc.
    2. Next step your device must be rooted. If your device is not rooted, then Xposed framework will not work on your device. Root access must available on your device before proceeding. If you don’t have a rooted device, then you can’t use Xposed Installer application on your android Phone or tablet. Root your android.
    3. If you are unable to use Xposed framework on your android device, then make sure that your device running on minimum Android 4.0 Ice Cream Sandwich version. Because, Xposed framework doesn’t support device which are running on Android version below 4.0.

      Xposed Installer only supports Android device which are running Android version 4.0+

    4. After fulfilling all the requirement required to run Xposed framework on your device. Now, you are ready to install Xposed Framework on your android device.
    5. You can download the latest Xposed framework installer app from here. After downloading the APK install it properly.
    6. Now, launch the Xposed framework Installer app from app drawer.
    7. Click on Framework, and wait until framework completes its installation by itself. After completion of installation reboot the device.
    8. Open the Xposed framework application.
    9. If application showing device ready pop-up then you can install different modules on your device. This will help you to start customizing your device.

    How to install an Xposed Module on any android Phone or Tablet?

    Xposed modules comes in form of normal APK file. This makes Xposed module easy to install on any android device. User can download and install different modules from Xposed installer app. Xposed installer app features a hundreds of modules in download section. For example, to install modules available in the Xposed Installer app just follow following steps:

    • Open the Xposed Installer application.
    • Go to the Download section.
    • From long list of available modules. Select the module which you want to install. You can check each and every module with a description written there.
    • Download the selected module and install it.

      install xposed module on android
      Install Xposed Framework Module on Android Phone, Tablet, etc.

    For example, there is “3dot Menu Mod” module which adds three dots option bar in the menu. Select it and after downloading it enable that module from Modules section. Done after Rebooting you can observe the changes.

    How to install third-party modules in Xposed framework?

    • Android user can also install third-party modules from different sources.
    • User have to install those modules like normal APK files. After installation user needs to enable that installed module from Xposed Installer application.
    • Every time you install different module you have to enable it from available modules option by selecting it.


  • What is Xposed Framework?

    What is Xposed Framework?

    What is the best way to tweak Android Operating system?

    There are lot of ways to tweak behavior of Android Operating system. Though Android is known for its customization potential. Non-root Android devices are not able to customize system files. Device which are not rooted needed to use different widgets and launchers to customize UI of the system. But, if user want to customize his device by changing attributes of system files in that case he needs root access on his device. With the help of root access user can improves or expands the potential of Android device. It gives you the ability to modify the system files of the Operating System. By flashing a Custom ROMs and Recoveries, user can modify each and every aspect of Android OS.

    Xposed Framework and its advantages

    Xposed is a Framework. It is used to apply different modules on Android operating system. This modules modifies the system attributes without disturbing or touching any System files and application. Different modules can be applied with the help of Xposed application. These modules are responsible for change in the behavior of the Android system. Xposed supports different versions of Android Operating system and ROMs. Xposed application makes modules easy to apply. User can undo applied changes with just one click. This functionality makes Xposed framework easy to use.

    Why to use Xposed framework? How it is better?

    Sometimes it is risky and complex procedure to unlock the device and then flash the Custom ROM on device. If device is not flash properly then it can lead device to brick condition. It will be so easier if we are able to modify system files just with ROOT permission. All credit goes to developers of Xposed Framework. Xposed require only root access to customize Android Operating system. It is simplest way to customize user experience of Android.


    One of the best way to tweak Android operating system is to use Xposed framework.

    Advantages of Xposed Framework in Android?

    Why Xposed framework is easy to use?

    When we install Xposed Module is applied all the changes are done on the memory. Default script is replaced with modified script. When we deactivate that module all changes applied on the memory are removed. Original script is restored on the memory. So, Simple. Rebooting the system user can get back to the original state of the system. This is one of the advantage of Xposed Module over Custom ROMs.

    With Xposed Framework user can make changes in Android system without flashing/installing a Custom ROM.
    Another advantage of Xposed framework is that it supports multiple modules threading. Those multiple modules can do changes on the same part of the system.  No need to combine different modified APKs.

    Most important question

    Where can I find different Xposed modules?

    You can download Xposed Modules from download section of the Xposed Framework Application. You need to just browse the module you want to apply.

    Download Option in Xposed Android Application
    Xposed Application Download Menu

    Xposed framework is lot better than flashing a ROM on Android device.

    The Xposed module also allows user to remap Android devices hardware buttons. If you are using a device which lacks of dedicated camera key, then with the help of Xposed Framework user can turn a volume rocker button into a dedicated camera button to capture images. It will solve many issues like How to use volume button to capture Images?

    It not ends here you can also use Volume button as a Power key also.

    Advantages of Xposed in Android Operating System.

    Learn How to use Xposed Framework on Android in simple steps.

    Click Here to Download Xposed Framework Installer for Android 2016

  • How to install CyanogenMod on any Android Phone, Tablet or device?

    How to install CyanogenMod on any Android Phone, Tablet or device?

    How to install CyanogenMod on any Android device?

    To install CyanogenMod on Android device is like to blow a new life into it. It gives lot of new features which are not available on Stock Android experience.

    Is there a risk to install CyanogenMod on android device? How to avoid it?
    When you install a Custom ROM on your android device it makes you to overwrite device’s stock ROM. This stock ROM is replaced with new Custom ROM. Manufacturer company wants user to stick with Operating System version provided by them. They doesn’t allow user to unlock boot-loader and flash custom ROM on their device. When you Unlock boot-loader or Root your device. It makes you to break agreement between user and manufacturer company. Due to that broken agreement, manufacturer will not be able to deliver services like warranty software upgrades to that specific devices. That’s why many users are not ready to install any custom ROM on their android devices. Warranty is the important aspect that resists user to flash Custom ROMs like CyanogenMod.

    Simple steps to install CM
    Easy steps to install CyanogenMod on Android device

    While installing CyanogenMod on any android device follow the following easy steps:

    Steps to follow while flashing CyanogenMod 13 on Motorola, Sony devices.

    • Root your device first:
      It’s easier to install CyanogenMod on any Android device if device has root access on it. If your device is not rooted, then you must root your device first.
    • Install Custom Recovery on your device:
      Custom recovery is another important thing to flash Custom ROMs on your device. Custom recovery helps user to flash ROMs easily.
    • Create backups:
      Create a backup of all important data on your device. Backup of data can be done from Setting menu. If you want to backup all your device data, then you must backup your device from Recovery menu. Third-party applications like Titanium Backup can be used to Backup all data according to need.
    • Important tip while flashing ROM on your device:

      Every device comes with its own kind of ROM. Avoid to flash another device’s ROM on your device. Download and flash ROM of respected device only. It will prevent your device from soft and hard bricking.

    • Get latest CyanogenMod for your device:
      After following all procedure which is stated above you have to download the CyanogenMod ROM for your device.
      There are two types of CyanogenMod ROMs are there:

      • Official CyanogenMod ROM:
        There are lot of numbers of android devices are there in market. So, it is impossible to build CyanogenMod ROM for each and every device. Cyanogen Developers Team only develops Official CM ROM for selected devices. You can check out that list from here. List of Android phones and tablets which supports CyanogenMod.
        If your device name is in that list then you can download Official CyanogenMod ROM for your device.
        Download CyanogenMod.
        Download the zip file to install CyanogenMod on Android device.
      • Unofficial CyanogenMod ROM:
        If your device doesn’t support Official CyanogenMod ROM then you can try different modified ROMs developed by developers. You just need to download that zip file of ROM.

    Companies like CREO and Xiaomi gives system update to their devices every month. Those system update contains bugs fixing and latest features. It helps to improve the stability of the device. Same portfolio is followed by CyanogenMod developers. The CyanogenMod ROM is available in two variants. Those two variants are as follows:

    • Nightly builds:
      What is Nightly build CM?

      In nightly build ROM, System update is given to respected device every day. These update includes latest features which are being tested by the CyanogenMod Developers Team. You can compare Nightly Build to the Beta version of the ROM. Nightly ROMs are less focused on stability. But,it comes up with lot of features.

      Nightly Build is nothing but Beta Version of the ROM

    • Milestone builds:
      What is Milestone CM build?

      Milestone build is developed for users who use their device as a daily driver. If you can compromise latest feature with stability, then Milestone Build is perfect for you. Milestone build is released at the beginning of every month. It is more focused on stability over features.
      Why so few number of devices are supported by CyanogenMod? This the reason why there are so less number of devices which are supported officially by Cyanogen.

    According to the availability download the CM build suitable to you and your device.

    • After downloading the ROM for your device. Now, its time to setup the device properly.

      CyanogenMod ROM does not come with any Google Services.

      Why CyanogenMod doesn’t comes up with Google apps and services?
      Why CM 13 don’t come up with Google apps?

    Due to licensing issues, Cyanogen doesn’t include any files which is related to Google Android. If you want to use Google applications and services you need to flash a separate ZIP package, known as the “GApps” separately. It will help you to access Google Services like Play Store, Google Maps and other services from Google.

    You can download the GApps package from here.

    Remember: Use GApps of same android version you are using.

    For Example: If you are running CM 13 which is based on Android Marshmallow 6.0 then use GApps of Android 6.0 only.

    • Now, it’s time to flash all the downloaded files on your android device. Follow the following simple steps to install CyanogenMod on your android device. Easy way to install CM 12, 12.1, 13 on android device.
      Simple steps to install CyanogenMod on any android device.
    • Step 1:
      Transfer the downloaded files of CyanogenMod ROM and the Google Apps package to the external storage of Android device.
      How to install CM on device which has not external storage? If your device doesn’t come up with external storage support, then transfer the files on Internal storage of your device.

      • At last always remember to check that you have downloaded the correct files.
    • Step 2:
      Reboot Android device into Recovery mode. Always use Custom Recovery while installing CM on your device. Know more about Recoveries by clicking here. How to install Recovery? How to access Recovery on android device?
    • Step 3:
      After accessing Recovery mode. Select following options from recovery mode:

      • wipe the /data
      • wipe /system partition
      • do a factory reset of your Android device
      • Don’t use format data option if you have stored files on the internal storage of your Android device.
      • format the system partition
        tap the Advanced Wipe option => select System from the list of partitions.
    • Step 4:
      Now you have to select ROM file to flash CyanogenMod ROM.

      • Click the Install button in Recovery
      • Navigate to the location where ROM file had transferred
      • Select the file and swipe to install the CyanogenMod ROM on your android device.
    • Step 5:
      After installing the ROM, you need to install the Google Apps package on your Android device.

      • Select the GApps ZIP file
      • Wait until process completes
      • After completing all the process Click on Reboot option and wait for 15-20 minutes.
    • This way you can install CyanogenMod ROM on any android device.
  • CyanogenMod for Android Device

    CyanogenMod for Android Device

    What is CyanogenMod? How it works? How to use it?

    Before knowing about How to install CyanogenMod on android phone or tablet?. User must know about CyanogenMod. So, what is CyanogenMod?. What makes CyanogenMod for Android so popular?

    Did you know about Custom ROM?
                        CyanogenMod is nothing but the customized version of Android Operating System. It is different than Stock Android operating system offered by Google. Why CyanogenMod is so popular? When you use CyanogenMod on Android device it offers lot of customization option than a vanilla Android. It makes CyanogenMod for android so popular than any other version of Android operating system.

    Who develops CyanogenMod for Android?

                        There are lot of questions about world’s most popular Custom ROM “CyanogenMod”Who developed it? When CyanogenMod got developed?

                      CyanogenMod is also known as CM. After the launch of first android smartphone HTC DREAM in 2008, developers discovered that with the help of privileged control, firmware of the Android smartphone can be tweaked. This privileged control is known as “ROOT ACCESS”.

    Android is Linux based Operating System  

    Android operating system is open source OS. With the help of root access in android operating system, user can modify device’s stock firmware.  This modified firmware can be re-install on the device. After the launch of first android smartphone, ‘Steve Kondik’ and ‘JesusFreke’ developed CyanogenMod in 2008.

    Founder of CyanogenMod
    CyanogenMod for Android Founder

    Root as a privileged control

    They used privileged control of Android root as a important tool to develop CyanogenMod for android devices. HTC DREAM was the first device to run CyanogenMod. After the success of CyanogenMod on HTC DREAM community of developers starts rolling in the world. Everyone wanted to customize Android operating system according to their need. Some of them worked hard to bring CyanogenMod on different devices. These community is now recognized as a “CyanogenMod Developers Team”. Now, CyanogenMod is not only the ROM. It is emerged as a software providing company. They are working hard to bring CyanogenMod on more and more devices.


    What is difference between Stock Android and CyanogenMod for Android?

    There are different reason for everyone to flash Custom ROM. Many manufacturers are unable to update their all devices with latest operating system. There are so less number of mobile companies like Nexus devices, Motorola Smartphones, Android One devices who gives timely update to their customers. But large number of mobile users are facing update issues with their android devices. To tackle these problem developers developed Custom ROMs which are based on latest AOSP codes. By flashing those Custom ROMs user can bring latest version of android operating system on their device.

    CyanogenMod developed by Cyanogen Team members. It brings lot of new features on the android devices.

    What makes CyanogenMod for Android so popular and different than Stock Android Operating System?

    CyanogenMod offers lot of new features as compared to Stock android operating system.

    • Performance Improvements
    • Privacy Guard
    • Advance control over hardware
    • Performance Options
    • Customization (user can customize anything on CM from Hardware buttons to Status bar)
    • Trebuchet Launcher (Launcher that can be customize)
    • Gesture Support
    • Native Themes Support

    Those features are difficult to found on Stock Firmware. This makes CyanogenMod different from Stock Android experience.