Category: Guide

  • How to check Android Device Supports Project Treble

    How to check Android Device Supports Project Treble

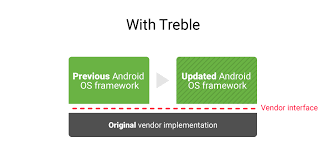
    We all are concerned about the regular android updates. Doesn’t matter which phone you use a midrange smartphone or flagship device. If you are not getting time-to-time Android updates and security patches then it makes uncomfortable. Leave android version updates to the side and just think about Android security patches. We use antivirus on our computer, laptop. It needs to update to the latest version. So it can protect us from outside threats. Same Android device needs monthly security patches so it can protect and secure our device from external threats. but because of some reasons, the device didn’t get those security updates on time. For that reason, Google has introduced Project Treble. Project Treble supported devices can be automatically updated to latest security patch directly from Google. We don’t require any attention from smartphone manufacturer or OEMs. How to check Android device supports Project Treble or not?

    Android Device Supports Project Treble

    How to check your Android device supports Project Treble or Not?

    To check your Android device supports Project Treble or not. You have to just follow the following simple steps.

    1. Download any Terminal application from Google Play Store.
      For example Android Device Supports Project Treble                                             Terminal Android (By Luna Inc)
      Play Store Download link.
    2. After Installation open the downloaded Application.
    3. After opening the app you will see some command window and cursor blinking.
    4. Type following commands one by one and hit enter

      (a) adb shell
      (b)
      getprop ro.treble.enabled

    5. If after second command result is true then your Android device supports Project Treble and if the result is false then your Android device doesn’t support Project Treble.

    The only Android devices running on Oreo version and higher than that can support Project Treble. Older Android version devices don’t support Project Treble. So, before testing Project, Treble support check your Android device version also.

    Learn More about Project Treble. 

  • Install Magisk Manager and Root Android Phone & Tablet

    Install Magisk Manager and Root Android Phone & Tablet

    In last thread, we talked about Magisk a System-less root. Today, we are going to talk about different ways to install Magisk Manager and Root Android Phone & tablet. One of the cleanest ways to install Magisk Manager is by using TWRP Recovery. When we flash new root binaries on the android device, old root binaries need to be removed. It helps to avoid malfunctioning and hard bricking of android phone. Flashing files on android device using TWRP recovery makes sure to replace the old binaries with the new one. That’s why flashing through recovery like TWRP always preferred to install Magisk Manager.

    Install Magisk Manager and Root Android Phone & tablet

    Follow following steps to Install Magisk Manager and Root Android Phone & tablet:

    STEP 1: Unlock bootloader of Android device

    Unlocking bootloader is one of the basic step required before experimenting with your android smartphone. It’s like unlocking the door of multiple possibilities. See this thread to know more about What is exactly Android Bootloader? and How to unlock Bootloader of any Android device?

    STEP 2: Install Custom Recovery like TWRP.

    After unlocking the bootloader of Android device, we need to flash the custom recovery on the device. Learn more about Android recovery: What is Android Recovery? The custom recovery like TWRP helps to flash .zip files as well as binary files on the android partition.

    Follow the following steps to install TWRP recovery on the android device:

    1. First Unlock bootloader of the android device on which you want to install TWRP recovery.
    2. Put your phone into Fastboot Mode or in Bootloader mode. (varies from device to device)
    3. Download the ADB files of your Android device.
    4. After downloading ADB files, open ADB shell using command prompt on Windows OS or Terminal on MAC OS. Remember to open the command window in a location where you placed ADB files.
      Install Magisk Manager and Root Android Phone & tablet
    5. Download Official TWRP Recovery for your Android device.
    6. Use the following command to flash the .img file of TWRP recovery.
      • fastboot flash recovery <recovery file name>.img

    Detail guide flash TWRP on your Android Device.

    STEP 3: Download the Magisk Manager ZIP file

    After completing the installation of TWRP, next step is to download supported Magisk ZIP file. This ZIP file will install the Magisk Framework on your phone. This framework will give your device a systemless root functionality. Get Magisk Manager for your Android device from here.

    We strongly recommend you to always use only supported files to root your android device.

    STEP 4: Flash Magisk ZIP in TWRP

    Reboot your Android device into TWRP recovery mode. Then TAP the install button from the main menu. Navigate to the folder where Magisk ZIP is downloaded. Select that ZIP file and just swipe the slider at bottom of the screen to install Magisk. After completion of installation just hit button Reboot.

    twrp magisk Install Magisk Manager and Root Android Phone & tablet

    STEP 5: Install Magisk Manager APK

    After successful installation of the Magisk framework, we need to install the Magisk Manager application which will access that framework. This application is no longer available on Play Store. so, to install it you need to enable “Unknown Sources” from setting menu. Download Latest Magisk Manager application and install it.

    STEP 6: Verify Root and SafetyNet status

    Open Magisk Manager app. Now, you can see a message towards the top of the screen that says “MAGISKSU (topjohnwu)” with a green checkmark next to it. That shows your phone is now rooted. If your seeing red mark on it then follow above steps properly.

    Magisk front page Install Magisk Manager and Root Android Phone & tablet

    This way you can install Magisk Manager and Root Android Phone & Tablet. For Magisk Modules stay tuned to elitcan.com and stay updated.

  • Things you must do before charging your brand new Android Phone or Tablet

    Things you must do before charging your brand new Android Phone or Tablet

    Things to do while charging Android Phone, Tablet. Tips to extend the battery life of smartphone.

    If you got a new Android smartphone. What things should you do before charging your brand new Android phone or tablet? Things you must avoid while charging of your smartphone? Today, we will talk about some tips that will help you to keep smartphones battery healthy as a long as possible. Important things you must do before charging your Android device.

    The reason behind the death of smartphone is an issue in battery life. It doesn’t matter your smartphone is new or old.

    Batteries are not made for lifetime purpose.

    Batteries are not immortal. After some charging cycles, batteries stop to hold electricity in it. Using proper ways we can maintain those cycles of charging and discharging so we can get maximum power. So the question is how to keep the battery in the best condition? There are some ways you have to follow while charging your brand new Android phone, tablet or pc. This will help to keep battery life healthy.

    Some of the important things you must do before charging your device running on Android.

    Things you must do before charging
    Things you must do before charging your brand new Android Phone or Tablet

    Check accessories properly

    After buying a new android phone, tablet. Check accessories properly. Specifications on accessories must match with specifications given on paper. If it doesn’t match then contact with Customer Care support for further guidance.

    Charging battery with Fast Charge charger

    There are lot of fast charging methods offered by Qualcomm’s Quick Charge, One Plus’s Dash Charging, Moto’s Adaptive Fast Charging, etc. In fast charging, the charger is capable to supply electricity at higher voltage and current. Which helps to charge the battery faster. So, how fast charging works? In fast charging, charger communicates with circuits on device which tells charger how much of electricity required to charge a battery. This way device talks with charger. And with higher voltage and current ratio battery gets charged at faster rate. This way Fast Charging for Android works.

    If your android phone or tablet doesn’t support fast charging then don’t use fast charger to charge your Android device. It effects on lifespan of battery. so for longer battery life try to use recommended charger given by the manufacturer.

    Charging at night or overcharging

    Many people charge their phone overnight. Average charging time of phone is only an hour or two to get 100 %. So there is no point charging your phone or tablet for long time than it requires. If you keep your phone charged overnight then you are increasing the amount of time your device spends with charger. It degrades the battery capacity little by little. Heavy dosage of tickle charge decrease the charge cycles of the battery.

    Using proper cable

    Unrecommended charging cable can damage U2I port on our smartphone. The port is responsible for charging and some other USB function. Improper handling of that port can damage the USB functionality of phone or tablet. Which can lead to the multiple consequences like phone doesn’t charge, phone won’t turn ON, etc. That’s why it is always recommended to use proper USB cable while charging your brand new Android phone or tablet. You can try braided USB cables which has a lot of advantages over regular USB cables.

    Avoid uncertified magnetic charging cables

    I have observed that many people are using un-certified magnetic charging cables. Those charging cables are easy to connect with USB port as compared to traditional USB cables. Always use proper magnetic charging cable. There are some risks to use magnetic USB cables. If device is made up of metallic body then sometimes you have to take care that charging cable and device body doesn’t get shorted.

    Using another Charger

    Always try to use the charger which comes with your phone. It comes with correct rating. While using another third-party charger make sure that it is supported by your phone. Never use low quality and cheap alternatives it may harm your phone or tablet. Many times such cheap chargers catch fire.

    These are some of the things you must do before charging your Phone or Tablet running on Android operating system. It helps you to retain more and more battery life. Still worried about your battery life.

    Thinking to buy Power Bank. Read How to choose right power bank for your mobile.

  • How to Use Android As A Remote Control For TV, PC, Set Top Box, PowerPoint, Projector

    How to Use Android As A Remote Control For TV, PC, Set Top Box, PowerPoint, Projector

    Use Android as a remote to Control any TV, PC, Set Top Box, and Projector from Android Phone

    Have you watched Iron Man 2? One of the finest movies Marvel has ever made isn’t it? Today I want to notice your attention towards one of the scenes where sanator Stern and government officials who hate Tony Stark wanted Military to have Tony Stark’s armor so that they can be powerful unlike anything! See it yourself below:

    https://www.youtube.com/watch?v=X5ge0pd7hMQ


    Most interesting part of the scene was to watch RDJ aka Tony Stark hacking, controlling TV Screen from his phone. In this era inspite of having technologies like AR, VR, we use traditional devices like TV, Projectors. So, Can You Control TV, Projectors, AC, Set Top Box, etc. devices from your Android Mobile Phone? How android as a remote works? What does it require to control the TV from your android mobile?

    Use Android as a remote
    How To Use Your Android Phone As A Remote Control For TV, PC, Set Top Box, PowerPoint, Projector

    How Android Remote Control Works (TV, AC, DTH, etc.)?

    First, we need to understand the working of a remote. In a remote, IR (Infrared) blaster device is attached. Data is sent over the infrared rays to other device which is to be controlled.

    When we press a button on remote a specific pulse of infrared light gets transmitted. And on another side, receiver decodes that pattern of signal and responds to that instructions. This way remote control works.

    Android IR Blaster

    Let’s see How To Control PC, TV, AC, SetTop Box, etc. With Android Mobile Phone IR Blaster? You can check List of mobile devices with IR Blaster. Use Builtin IR Blaster or Buy New one which fits in your headphone port.

    Now, let’s take an example, Xiaomi’s smartphone comes up with MI Remote application. In that application, major all appliances are listed out. After completing self explanatory first time setup, You can control any electrical appliances with just one click. Like that there are plenty of applications available on Google Play Store. Those applications help us to control the electrical appliances. You just need a smartphone with IR Blaster. 

    Advantage of IR Blaster

    1. It doesn’t require Internet.
    2. It is easy to use.
    3. Anyone from child to super adult can use it.
    4. Compatible with most of the appliances.

    Disadvantage of IR Blaster

    1. You can only do operations like turning on the TV, controlling Volume and channel, etc.
    2. You can not operate PC from it.
    3. Sometimes it doesn’t work. Because of external interruption of its frequency.

    Android Remote Over WiFi

    The second way to operate appliances like PC from Android is by using network connectivity. There are multiple methods to do it. You can use the applications like Team Viewer, Microsoft Remote Control or others. It will help you to manage, operate and control the PC. It is more effective because it gives you end to end native support.

    This way we can control electrical appliances from android phone. Doesn’t matter where you can use it. It can be Samsung/Sony/LG TV or projector connected in your classroom too. So, let’s Use Android Phone to Control Other Devices like TV, AC, Projector, Set Top Box, DTH, Blue Ray, DVD, PC, PowerPoint, etc. Did we miss anything? Let us know in the comments section below.

  • How To Fix iPhone 6, 7, 8, X and iOS 11 Instagram Crash, Freezing Issue?

    How To Fix iPhone 6, 7, 8, X and iOS 11 Instagram Crash, Freezing Issue?

    Fix Instagram crashing, freezing, force stopping issue on iPhone 6/6s, iPhone 7/7 Plus, iPhone 8/8Plus and on iPhone X

    Memories, one of the precious gift of a human being. It is one of the important things in our life which plays a big role. It allows us to remember specific moment occurred in the past. Some of them are easy to remember while some we can’t. We can not remember those memories longer. In such cases, photography has given one of the media to a human being so we can store our memories. It is desirable and easy to share with other people. In childhood days we used to maintain album of such photos. Now, with the help of photo-sharing services like Instagram, Snapchat we can share and maintain our photographs so easily. And if you got good camera phone like iPhone 7/8 or iPhone X then its well and good. But from last week many users of iPhone are facing Instagram freezing issues. so, What is causing glitch of iPhone X/ 8/ 7/ 6/ other iPhone Versions?

    How to fix iPhone 6, 7, 8, X and iOS 11 Instagram freezing issue?

    Why is Instagram crashing on iPhone 7/8 and on iPhone X?

    Apple has launched three major devices iPhone X, iPhone 8 and iPhone 8 Plus in October 2017. Those devices come up with the bionic chip.

    Apple also claimed that bionic chipset has made iPhone 8 and iPhone X fastest mobiles on the planet right now.

    With such great speed and power if you facing Instagram crashing issues on iPhone then it is a big concern. But the reason lies in the software of iPhone devices. After the launch of iPhone 8 and X, Apple started rolling out iOS 11 updates to the new and existing devices. A large number of people started facing such issues after updating their iPhones. Compatibility of Instagram application with iPhone’s updated software was so buggy. Because of this Instagram is crashing on iPhone devices.

    How to fix the Instagram freezing issues on iPhone 7, iPhone 8 and iPhone X?

    Before going to following steps try to RESTART your iPhone 7, iPhone 8 or iPhone X. And check that is your problem is now solved or not. If your problem was solved then avoid following methods. If you are still facing trouble with Instagram then try Instagram on Mobile Data as well as on Wi-Fi. It is recommended because iOS deals with different networks differently.

    Oops…!! Still facing the same issue? Don’t worry follow the simple method mentioned below:

    Update! Updating current application with new one helps the user to fix common bugs present in it. From App Store, we can update our existing application. Check that your Instagram Application is updated or if not then update it. Or try to reinstall Instagram on your device. It will solve your problems like quick freezing and crashing Instagram application on iOS-powered devices.

    How to reinstall Instagram application on iPhone 6, iPhone 7, iPhone 8 and iPhone x?

    1. Go to Home screen.
    2. Tap and hold the Instagram app icon until it vibrates and shakes.
    3. Tap x on the app to remove it.
    4. After uninstalling, navigate to the App Store and click on install Instagram button.
    5. Done. Now, you can enjoy Instagram application on your Apple devices.

    This way we can use Instagram on iPhone 6/7/8/X without any lag and issue. Post your photos captured from iPhone on Instagram with hast tag #iamelit. Try more than one Instagram account on one phone.

  • How to Turn Off Windows 10 Background Data?

    How to Turn Off Windows 10 Background Data?

    1. Turn Off, Restrict, Disable, Block, Stop Windows XP/ 7/ 8/ 8.1/ 10 Background Data

    Yesterday while working for ElitCan, suddenly my 2GB high-speed data of Jio ended unexpectedly within a few minutes. I was really shocked since I was only browsing Wikipedia and Facebook. Mostly images and text content. How can those sites eat my 2GB data within minutes? So, I decided to investigate where my data is lost. From the settings menu, I found that in background windows update was downloaded. This Windows 10 Background Data Consumption eaten all of my data. You might have a similar experience before. Hence, today, I am going to tell you How to Block Background Data on Windows PC.

    How to Stop Windows XP/ 7/ 8/ 8.1/ 10 Background Data?
    How to Stop Windows XP/ 7/ 8/ 8.1/ 10 Background Data?


    What’s Consuming Windows 10 Background Data, Internet Bandwidth?

    Like Android, Windows also has a large user base. Since Windows 10 is going to be Microsoft’s last Windows update, it has come with a lot of updates, features and even built-in antivirus: Windows Defender. With all those good things, come to a lot of bugs! To fix those bugs, issues, problems, security vulnerabilities, updates are most necessary! And Windows 10 automatically starts its update service causing Windows 10 Eating Up Internet.


    By default Windows operating system sets data connection to non-metered. Which doesn’t restricts background data activity on windows desktop, laptops or on tablets.

    But most of the time our internet service provider provides us with a limited amount of internet data. so in such case, we need to set internet connection on limited mode. so that data can be used only on user’s demand. Which helps to restrict the background data activity on windows 10. This way by setting network connection to metered can help us to block the background data usage.

    Steps to Stop Windows XP/ 7/ 8/ 8.1/ 10 Background Data?

    1. Open the Settings menu on the Windows Operating System.
    2. Click on Network & Internet Option.
    3. If you are using Wi-Fi connectivity, click on Wi-Fi. Otherwise, select Ethernet or Dial-Up option.
    4. Click on the Network you are connected.
    5. After clicking on it there will be an option of Metered Connection. Activate that option.
    6. Done.

    Turn Off, Block, Restrict, Disable, Stop Windows 10 Background Data

    This way in simple steps we can Turn Off Windows 10 Background Data. Now, all the background data activity will not run until and unless the user runs it.


  • Android Rooting For Beginners?

    Android Rooting For Beginners?

     What is Rooting Android Phone? Means? Purpose to Root Phone?

    Root word has two meanings one of them is basic source, cause or you can say origin of that things and another one is it is one of the part of plant which helps plant to attaches it to ground. 

    android rooting for newbies, beginners
    Android Rooting For Newbies

    Same meaning of root is there in android smartphone. Simply, Android Rooting means running your android device (Phone, Tablet, PC, Phablet, etc.) with full system access. Rooting means unlocking the potential of operating system so you can customize your device according to you without any obstacle. After rooting your android device, you can install unapproved applications, update or replace the OS or firmware, overclocking and under-clocking of the processor and you can personalize user interface (UI) of your device. Even completely change Look N Feel of your smartphone.

    In Windows it is referred as a ‘ADMINSTRTIOR USER’ where in Android it is ‘ROOT USER’

    Smartphone which runs on Android Operating System requires access to view, to modify, to delete the system files and settings. With the help of that root access user can also control the permissions of device which gives you seamless access to device.  If user wants to modify such things from device then he requires a permission (i.e., root access). It gives ability to modify system files, applications and settings. Those abilities are inaccessible to normal Android user. That’s why one who with root access is ‘SUPERUSER’. As Android Operating System also uses Kernel of Linux. It is nearly same like as LINUX based operating system.

    As a living being who has super power called as SUPERMAN.

    User who has root access is called as SUPERUSER.

    Android Rooting SuperUser
    SuperMan is SuperUser


    Why to Root Android? Purpose of Rooting Android Phone?

    Most important thing mobile companies doesn’t provide root access because of security threat to user privacy. Android comes with some security system which separates each and every application from another. When you root your android device you breach that security. It may cause some serious damage to your operating system and your privacy. That’s why when you root your smartphone you void your warranty of your device. Exceptions are the companies like YU, which encourage users to root their Android Smartphones. Rooting YU phones doesn’t void the warranty.

    Why Android Rooting Void Warranty?

    When you root your android device you remove all restrictions required to safeguard your device. Means you are exposing your device to malware. Exposing device for malware means you are infected. It may lead to bricking of your device. To protect from that threat mobile companies don’t provide root accessibility.

    After rooting your device, you can modify the system files without any restriction. User can also delete critical system files. Which will lead to serious problem. Smartphones are not easy as desktop so you can re-install android. To protect user from deleting system files root permission is not permitted from manufacturer.

    That’s it for today. Let us know how did you find first post on elitcan.com? Do you like it or not? Let us know your thoughts in the comment section below.