Author: Saurabh Patil

  • OnePlus 7 Pro Specifications

    OnePlus 7 Pro Specifications

    OnePlus 7 Pro Specifications. The OnePlus smartphones are considered as flagship killer. The way it is manufactured, its specifications make it one of the most awaited smartphone of the year. This time OnePlus is ready to boom the market with new offerings like Motor Controlled pop-up selfie camera which gives you less screen to body ratio. OnePlus 7 Pro specifications are mentioned below.

    OnePlus 7 Pro Specifications
    AnnouncedMay 14, 2019
    Dimensions162.6 x 76 x 8.8 mm
    Weight
    BuildFront-Back Glass, Aluminum Frame
    SIMDual Nano SIM
    DisplayOptic AMOLED
    1440 x 3120 pixels
    19.5:9 ratio (~518 ppi density)
    Corning Gorilla Glass 6
    DCI-P3
    OSAndroid Pie 9.0 based Oxygen OS
    ProcessorQualcomm SDM855 Snapdragon 855 (7 nm)
    Octa-core
    (1×2.84 GHz Kryo 485 & 3×2.41 GHz Kryo 485 &
    4×1.78 GHz Kryo 485)
    GPU Adreno 640
    Memory CardNo
    Internal 256 GB, 10 GB RAM
    Back CameraTriple Camera
    Front Camera Motorized pop-up 16 MP, f/2.0
    3.5mm JackNo
    NFCYes
    RadioNo
    USB 2.0 Type-C 1.0 reversible connector
    Biometric Fingerprint (under display)
    Battery Non-removable Li-Po 4000 mAh battery
    ChargingFast battery charging 30W
    Colors Nebula Blue, Mirror Gray

    Why OnePlus devices are so special?
    OnePlus devices run on Oxygen OS platform based on latest Android 9.0 Pie version. Oxygen OS is designed and developed to enhance software performance on the OnePlus devices. This unique combination of best hardware and software in the class makes every OnePlus device special. This is the recipe of OnePlus behind the flagship killer tag.

    In 2019, OnePlus is going to launch three variants of OnePlus 7 device. Higher version expected to come up with 10/12GB of RAM. Hell lot of RAM.

    You can purchase OnePlus 7 devices from Amazon, OnePlus Store, Chroma Store and from Reliance Digital. You can also exchange yout old smartphone to get brand new OnePlus 7 device.

  • OnePlus 7 All Variants Specification ROM News

    OnePlus 7 All Variants Specification ROM News

    OnePlus 7 All variants Specifications.
    The OnePlus 7 is an Android-based smartphone powered by Qualcomm’s flagship octa-core processor Snapdragon 855. The OnePlus 7 is the next generation device to the OnePlus 6/6T.

    Find out the OnePlus 7 All variants Specifications ROM News as below.

    OnePlus 7 All variants Specifications
    OnePlus 7 All variants Specifications

    Watch the OnePlus 7 live launch keynote on May 14, 2019.
    Click here to watch the live launch of OnePlus 7 exclusive.

    OnePlus 7 All variants Specifications

    OnePlus 7 Specifications click here.

    OnePlus 7 ROM click here.

    OnePlus 7 Images click here.

    OnePlus 7 Accessories click here.

    OnePlus 7 News click here.

  • Buy One Plus 6 Red Color smartphone on OLX

    Buy One Plus 6 Red Color smartphone on OLX


    From, last one week I am thinking about the Cyber-Crime and how to stop it.  Then I found that nearly 7 out of 10 cases from Cyber-Crime comes from reselling market like OLX and Quicker. There are multiple groups of people active on OLX and another e-commerce platform who have posted fraud advertisement. Most of those advertisements are related to One Plus 6 smartphone. Will you buy One Plus 6 Red Color smartphone on OLX.

    Selling smartphone by giving fake identity proof of Army Person is one of the worst things about it. They are targeting people from all over India by posting the same advertisement for multiple locations. Means larger area can be covered. Such type of fraud people must be punished as they are selling smartphone under the name of Indian Army Personal. If you go to buy One Plus 6 Red Color smartphone on OLX and if you found advertisement like that then report it as a Fraud and never buy anything from people like this.

    Some of the fraud images of  advertisement “Buy One Plus 6 Red Color smartphone on OLX” as follows:

    Share this news as much as you can. And always remember OLX provides the platform for seller and buyer only. They don’t have any role in it. So don’t trust anyone blindly. Because awareness and caution is the only key to stop Cyber-Crime.

  • Defeat Cyber-crime: An Introduction

    Defeat Cyber-crime: An Introduction

    Today’s, a generation has seen a lot of ups and downs in Technology World. We are the generation which has seen Analog to Digital Transformation. Technically we have evolved a lot. Sometimes, we say it Digitalization, sometimes development. Right now, we are so mesmerized by watching digital revolution in our neighborhood. That we are not noticing the side-effects of it. Many people are using Digital Platform for robbing, frauding, cheating and for offensive things. Such things are called as Cyber-Crime. Today, we are going to discuss Privacy, Security, and Cyber-Crime. So we can defeat Cyber-Crime together.

    Privacy and security of our personal information are at high risk. Even we are in the protected zone still, there is a danger to our personal identity on a digital platform. The biggest challenge is to access and store important data. The awareness is the only key to stop it. Which is not good. Because awareness comes from experience.

    Cyber-Crime is now more profitable than the Mafia and Drug trade.

    Saurabh Patil

    Cyber-crime safety is that matters, really..!!

    Maybe you may found it boring. But it is a fact that Cyber-Crime is one of the most deadlier weapons available on the earth. Forget about the nuclear attack. It has the power to destroy the identity of any person. so, how to defeat cyber-crime?

    First, we will learn about the activities that come under the Cyber-Crime.

    (1) Financial Fraud
    (2) Activities related to Terrorism
    (3) Extortion Cases
    (4) Privacy Breach
    (5) Cyber Warfare
    (6) Offensive Content
    (7) Online Harassment
    (8) Drug Trafficking
    (9) Pornography and Many More.
    There are a lot of such activities are carried by misusing the internet and computer.

    The government is also working with the number of agencies to control the Cyber-Crime. But, we have to fight with it together so we can build a safe and secure country.
    Following areas need to cover to fight with Cyber-Crime:
    (1) Evade Detection
    (2) Penalties
    (3) Awareness
    (4) Intelligence
    (5) Law Reinforcement

    In the next article, I will guide you more about such incidents. And multiple ways to avoid being a victim of Cyber-Crime.

  • How to Fix “E: Could not get lock /var/lib/dpkg/lock” issue on Linux

    How to Fix “E: Could not get lock /var/lib/dpkg/lock” issue on Linux

    Many times you might have encountered the error like “E: Could not get lock /var/lib/dpkg/lock”. It means that unable to lock the administration directory as another process is using it. This error can be annoying especially for new users who are trying Linux operating system the first time. If you don’t know the cause of the error then it gets difficult to solve that one.

    Below is an example showing the lock file error on Ubuntu 16.04 LTS.

    E: Could not get lock /var/lib/dpkg/lock
    Ubuntu showing unable to lock admin directory.

    How to solve “E: Could not get lock /var/lib/dpkg/lock” error?

    There are several ways to fix that error. But, we will go through only effective ways to fix that error. We will go through the following steps to fix that error.

    STEP 1: Kill all the running apt processes

    Using terminal command we have to kill all the apt process which are running in the background. First we need to generate a list of all apt processes. This can be generated by typing following command in the Terminal Emulator.

    Command:
    $ ps -A | grep apt
    Output:

    E: Could not get lock /var/lib/dpkg/lock

    Above command will show you all the apt process running in the background. It gives you output like “7430 pts/7 00:00:00 apt-get”. Here, 7430 is Process ID. For your case number can be different.

    STEP 2: Kill the background apt processes

    Now we just need to kill the apt processes running in the background of the system. To kill that process we need to type following command in the Terminal Emulator.

    Command:
    sudo kill -SIGKILL <process ID>
    Example:   sudo kill -SIGKILL 7430

    It will kill the ongoing process running in the background. Still, facing the same issue then try following method to fix “E: Could not get lock /var/lib/dpkg/lock” issue.

    If above method is not working for you then running process in the background can be of different type. For such process, we need to remove the lock from /var/lib/dpkg/lock directory.  After removing the lock, we can continue installing software and resources.

    How to remove the lock on /var/lib/dpkg/lock directory?

    Open the terminal and enter the following command to remove the lock on the directory.
    Command:

    rm /var/lib/dpkg/lock

    It will ask you for the confirmation after entering above command.
    rm: remove write-protected regular empty file ‘/var/lib/dpkg/lock’?
    To remove the lock press Y after seeing this message. If the lock doesn’t remove then try 2-3 times. After unlocking the directory you can continue your work.

    Easy and simple way to fix “E: Could not get lock /var/lib/dpkg/lock” issue on any Linux based operating system. For much more tips stay tuned.

  • What is Project Treble in Android OS?

    What is Project Treble in Android OS?

    Understanding Project Treble. How is Project Treble going to change update cycle of Android Operating System? How is Google going to implement Project Treble in Android OS?

    Google releases the newer Android version every year. The newest update of Android comes up with a lot of new features, improvements and with security patches. But, how many percentages of devices are able to get that update. There are so fewer devices which are getting the latest update. Many flagship devices also fail to receive time-to-time updates. How can you expect to get the latest update on your mid-range device as it releases? How Project Treble in Android OS going to affect on upcoming smartphones?

    Is Google playing with us?

    No, it’s not only about Google. Nearly 90 percent of devices come up with preloaded applications, bloatware, UI modifications. They didn’t come up with pure stock android. Device manufacturer needs to work for every separate device to release the latest update of Android. It is not possible for OEM to work on it as every year they release dozens of devices. First, they have to think about Flagship devices, then it comes to mid-range devices and so on. This makes the whole process lengthy and time-consuming. That’s the major reason why our smartphone didn’t get the latest update as it releases.

    From past two years, Google is trying to release its latest Android updates on maximum devices. Reports from last two years show that it’s not actually happening. Google has no control over smartphone manufacturer. Google can’t force them to release the latest update. That’s why the graph of Adoption of Google’s newest operating system is less than 10%. Its a big concern for Google. To fix that big issue Google changed some Android framework which is called as Project Treble. So, what is actually Project Treble in Android OS? Let’s find out.

    What is Project Treble in Android OS

    What is Project Treble?

    Project Treble in Android OS is an attempt by Google to fix clog that slows down the Android update procedure. Technically, Treble is a modification in android architecture that communicates with hardware inside the device. The upcoming Android devices will come up with futureproof vendor implementation. Starting with Android Oreo version Google is in talks with device manufacturer regarding Project Treble. It will take time to implement it on the large basis as more than half of the devices are running an older version of Android Operating System. According to Google, Project treble ensures that upcoming Android devices will get latest updates faster than ever. After reading all this stuff about Project Treble, I am still confused about how Google is going to manage all those millions of devices. 

    If you check statistics of Android’s distribution then you can observe the humongous gap between latest and previous android version. Currently, 28.1 percent of phones running Android 6.x (Marshmallow), and 28.5 percent on Android 7.x (Nougat). That means nearly half of the Android phones are running on a nearly-two-year-old operating system. And most terrible statistics is that only 4.1+ percent of devices are running on latest android version i.e., Android 8.x (Oreo). In short, we can say that nearly 96 percent of Android devices are running an old version of Android.

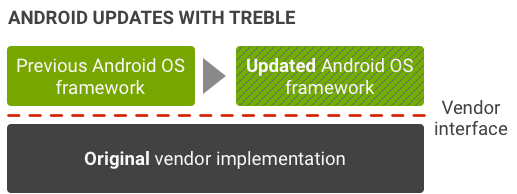
    How Android updates work?

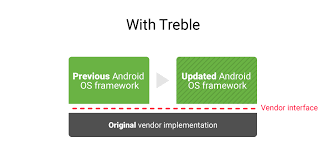
    There are two parts of the operating system code:

    • The OS Framework
    • Low-Level software (Vendor Implementation)

    Project Treble in Android OS

    Why device makers like Samsung, LG, Sony are not able to give a timely update on their devices? Before rolling out the latest update, OEMs like Samsung, LG, HTC, Xiaomi, Sony needs to do major changes in code. This is likely the cause for delay in Android updates from manufacturers. With OS Framework device manufacturers also need to do modifications in low-level software. The manufacturer has to work a lot.

    After all, those implementations device manufacturer can roll out the update to devices. If any OEM wants to update their device line up. Then they have to update android os code and low-level hardware code also. After updating those codes, the update can be pushed out to devices. But problem is that the low-level hardware code is generally maintained by the chip maker. So, for example, if Xiaomi wants to push an update to one of its phones. Then they have to wait for chipmakers like Qualcomm or Mediatek to release source code which will support the latest update. Here you can see that each and every manufacturer is dependent on one other. Without their support update cannot be rolled out.

    With Android Oreo and beyond, Google has changed that scenario. Google has changed the framework of the Android operating system. Those improvements are codenamed as Project Treble in Android OS. It has separated the hardware code and OS code. With that separation, device manufacturers don’t have to wait for the chipmakers to update their low-level hardware code. It will remain the same. OEMs will be free to update their software. Here is the complete documentation of Treble by Google.

    Hopefully, it will make a significant change in the update cycle of the Android operating system. Check if your device supports Project Treble or not.


  • How to check Android Device Supports Project Treble

    How to check Android Device Supports Project Treble

    We all are concerned about the regular android updates. Doesn’t matter which phone you use a midrange smartphone or flagship device. If you are not getting time-to-time Android updates and security patches then it makes uncomfortable. Leave android version updates to the side and just think about Android security patches. We use antivirus on our computer, laptop. It needs to update to the latest version. So it can protect us from outside threats. Same Android device needs monthly security patches so it can protect and secure our device from external threats. but because of some reasons, the device didn’t get those security updates on time. For that reason, Google has introduced Project Treble. Project Treble supported devices can be automatically updated to latest security patch directly from Google. We don’t require any attention from smartphone manufacturer or OEMs. How to check Android device supports Project Treble or not?

    Android Device Supports Project Treble

    How to check your Android device supports Project Treble or Not?

    To check your Android device supports Project Treble or not. You have to just follow the following simple steps.

    1. Download any Terminal application from Google Play Store.
      For example Android Device Supports Project Treble                                             Terminal Android (By Luna Inc)
      Play Store Download link.
    2. After Installation open the downloaded Application.
    3. After opening the app you will see some command window and cursor blinking.
    4. Type following commands one by one and hit enter

      (a) adb shell
      (b)
      getprop ro.treble.enabled

    5. If after second command result is true then your Android device supports Project Treble and if the result is false then your Android device doesn’t support Project Treble.

    The only Android devices running on Oreo version and higher than that can support Project Treble. Older Android version devices don’t support Project Treble. So, before testing Project, Treble support check your Android device version also.

    Learn More about Project Treble. 

  • Install Magisk Manager and Root Android Phone & Tablet

    Install Magisk Manager and Root Android Phone & Tablet

    In last thread, we talked about Magisk a System-less root. Today, we are going to talk about different ways to install Magisk Manager and Root Android Phone & tablet. One of the cleanest ways to install Magisk Manager is by using TWRP Recovery. When we flash new root binaries on the android device, old root binaries need to be removed. It helps to avoid malfunctioning and hard bricking of android phone. Flashing files on android device using TWRP recovery makes sure to replace the old binaries with the new one. That’s why flashing through recovery like TWRP always preferred to install Magisk Manager.

    Install Magisk Manager and Root Android Phone & tablet

    Follow following steps to Install Magisk Manager and Root Android Phone & tablet:

    STEP 1: Unlock bootloader of Android device

    Unlocking bootloader is one of the basic step required before experimenting with your android smartphone. It’s like unlocking the door of multiple possibilities. See this thread to know more about What is exactly Android Bootloader? and How to unlock Bootloader of any Android device?

    STEP 2: Install Custom Recovery like TWRP.

    After unlocking the bootloader of Android device, we need to flash the custom recovery on the device. Learn more about Android recovery: What is Android Recovery? The custom recovery like TWRP helps to flash .zip files as well as binary files on the android partition.

    Follow the following steps to install TWRP recovery on the android device:

    1. First Unlock bootloader of the android device on which you want to install TWRP recovery.
    2. Put your phone into Fastboot Mode or in Bootloader mode. (varies from device to device)
    3. Download the ADB files of your Android device.
    4. After downloading ADB files, open ADB shell using command prompt on Windows OS or Terminal on MAC OS. Remember to open the command window in a location where you placed ADB files.
      Install Magisk Manager and Root Android Phone & tablet
    5. Download Official TWRP Recovery for your Android device.
    6. Use the following command to flash the .img file of TWRP recovery.
      • fastboot flash recovery <recovery file name>.img

    Detail guide flash TWRP on your Android Device.

    STEP 3: Download the Magisk Manager ZIP file

    After completing the installation of TWRP, next step is to download supported Magisk ZIP file. This ZIP file will install the Magisk Framework on your phone. This framework will give your device a systemless root functionality. Get Magisk Manager for your Android device from here.

    We strongly recommend you to always use only supported files to root your android device.

    STEP 4: Flash Magisk ZIP in TWRP

    Reboot your Android device into TWRP recovery mode. Then TAP the install button from the main menu. Navigate to the folder where Magisk ZIP is downloaded. Select that ZIP file and just swipe the slider at bottom of the screen to install Magisk. After completion of installation just hit button Reboot.

    twrp magisk Install Magisk Manager and Root Android Phone & tablet

    STEP 5: Install Magisk Manager APK

    After successful installation of the Magisk framework, we need to install the Magisk Manager application which will access that framework. This application is no longer available on Play Store. so, to install it you need to enable “Unknown Sources” from setting menu. Download Latest Magisk Manager application and install it.

    STEP 6: Verify Root and SafetyNet status

    Open Magisk Manager app. Now, you can see a message towards the top of the screen that says “MAGISKSU (topjohnwu)” with a green checkmark next to it. That shows your phone is now rooted. If your seeing red mark on it then follow above steps properly.

    Magisk front page Install Magisk Manager and Root Android Phone & tablet

    This way you can install Magisk Manager and Root Android Phone & Tablet. For Magisk Modules stay tuned to elitcan.com and stay updated.

  • Guide: iPhone X like Swipe Up based Gesture on Android

    Guide: iPhone X like Swipe Up based Gesture on Android

    iPhone X like Swipe Up based Gesture on any Android phone or tablet. Navigation gesture on OnePlus and MI devices.

    We saw many innovative and popular smartphone in the year 2017. List of innovative smartphones cannot be completed without iPhones. In 2017, Apple released iPhone X with a lot of new innovative features. Features like Gesture-based navigation, Full-screen display, Face ID, etc are only available exclusively on iPhone X. Difference between ordinary iPhone and iPhone X is a home button. In iPhone X, Apple replaced the Home Button with Swipe Gesture Navigation. By swiping halfway up from the bottom to left-right of the screen you can control the phone. With the help of some Android apps, a user can try iPhone X like Swipe Up based Gesture on any Android smartphone.

    iPhone X like Swipe Up based Gesture

    How to get iPhone X like Swipe up based gestures on Android phone or tablet?

    Using third-party applications like Gesture Control

    iPhone X like Swipe Up based Gesture

    Gesture Control is one of the easy and lightweight Android application available on Play Store. It provides a lot of iPhone X like Swipe Up based gesture which can be used for navigation. Those gestures can be used to access Home Screen, Open Notification Panel, access Quick Settings, go back, access recent application, etc. This type of applications helps to operate a smartphone with a large screen. Gesture Control application can be configured as per the user’s requirement. On the big screen, it makes difficult to access notification panel by swiping down the notification bar from upside to down. But by setting iPhone X like Swipe up based gesture we can access notification panel instantly.

    Play Store Link of Gesture Control – Next Level Navigation

    Some of the iPhone X like Swipe Up based gesture which can be used on any android phone, tablet using Gesture Control Application.

    iPhone X like Swipe Up based Gesture

    • Swipe Up
    • Swipe Left
    • Swipe Right
    • Double Tap
    • Double Tap and Hold
    • Long Tap
    • Swipe Up and Hold
    • Swipe Down and Hold
    • Swipe Left and hold
    • Swipe Right and hold
    • Swipe Halfway Up
    • Swipe Halfway Up and hold
    • Swip Halfway Up to Bottom

    Like Gesture Control Application there are Multiple Android applications available on Play Store which can be used to set up iPhone X like gestures on Android tablets and phones.

    How to use iPhone X like Navigation gestures on OnePlus 5T, 3T?

    One Plus started to roll out the beta version of Android Oreo for its devices. One Plus 5T and One Plus 3T are now getting updated to Oxygen OS based on Oreo. In that update, One Plus giving users the exclusive option to use iPhone X like gesture function instead of on-screen navigation keys.

    iPhone x like navigation gestures on OnePlus 3T, 5T:

    • Swipe up from the bottom-center area of the screen to go home
    • Swipe up from the bottom-left to go back or home
    • Swipe up from the bottom-right to go back
    • Swipe up and hold from the bottom-center to jump recent app list

    How to Enable iPhone X like navigation gestures on MI, Redmi Phones?

    From the year 2017, We have seen many bezel-less smartphones like Mi MIX 1, MI MIX 2, iPhone X, One Plus 5T, Samsung Galaxy S8, etc. In the bezel-less phone, navigation seems more difficult as the user has to deal with larger screen size. Sometimes jumping from one application to another makes more difficult on full-screen displays. With the introduction of navigation gestures, it gets easier to navigate on full-screen smartphones. With the release of MI MIX and MI MIX 2, Xiaomi proved that they are more than a budget smartphone. Xiaomi smartphones are powered by MIUI. MIUI is known for its features and iOS-like user interface. After the release of iPhone X, Xiaomi announced that it will bring navigation gesture support to its Full-Screen smartphones. Now, MIUI 9 Beta version of MI MIX and MI MIX 2 coming up with iPhone X like navigation gestures. Xiaomi is also set to release Redmi 5 Plus globally on 14th February 2018. According to the latest news, Redmi 5 Plus will be mid-range full-screen size smartphone. MIUI forum is claiming that Redmi 5 Plus will support navigation gesture feature out of the box. Isn’t it a great news for MI fans?

    iPhone X like Swipe Up based Gesture

    If you want to use iPhone X like navigation gesture on your MI device then update your MI or Redmi device with latest MIUI Beta ROM. You can also check the status on Official MIUI Forum. Where you will get all news regarding features rollout and support.

    Did you already receive navigation gesture support on your device? Also, Write your opinion regarding gesture-based navigation on a smartphone in the following comment.

    Fix Instagram freezing issue on iPhone X.

  • Things you must do before charging your brand new Android Phone or Tablet

    Things you must do before charging your brand new Android Phone or Tablet

    Things to do while charging Android Phone, Tablet. Tips to extend the battery life of smartphone.

    If you got a new Android smartphone. What things should you do before charging your brand new Android phone or tablet? Things you must avoid while charging of your smartphone? Today, we will talk about some tips that will help you to keep smartphones battery healthy as a long as possible. Important things you must do before charging your Android device.

    The reason behind the death of smartphone is an issue in battery life. It doesn’t matter your smartphone is new or old.

    Batteries are not made for lifetime purpose.

    Batteries are not immortal. After some charging cycles, batteries stop to hold electricity in it. Using proper ways we can maintain those cycles of charging and discharging so we can get maximum power. So the question is how to keep the battery in the best condition? There are some ways you have to follow while charging your brand new Android phone, tablet or pc. This will help to keep battery life healthy.

    Some of the important things you must do before charging your device running on Android.

    Things you must do before charging
    Things you must do before charging your brand new Android Phone or Tablet

    Check accessories properly

    After buying a new android phone, tablet. Check accessories properly. Specifications on accessories must match with specifications given on paper. If it doesn’t match then contact with Customer Care support for further guidance.

    Charging battery with Fast Charge charger

    There are lot of fast charging methods offered by Qualcomm’s Quick Charge, One Plus’s Dash Charging, Moto’s Adaptive Fast Charging, etc. In fast charging, the charger is capable to supply electricity at higher voltage and current. Which helps to charge the battery faster. So, how fast charging works? In fast charging, charger communicates with circuits on device which tells charger how much of electricity required to charge a battery. This way device talks with charger. And with higher voltage and current ratio battery gets charged at faster rate. This way Fast Charging for Android works.

    If your android phone or tablet doesn’t support fast charging then don’t use fast charger to charge your Android device. It effects on lifespan of battery. so for longer battery life try to use recommended charger given by the manufacturer.

    Charging at night or overcharging

    Many people charge their phone overnight. Average charging time of phone is only an hour or two to get 100 %. So there is no point charging your phone or tablet for long time than it requires. If you keep your phone charged overnight then you are increasing the amount of time your device spends with charger. It degrades the battery capacity little by little. Heavy dosage of tickle charge decrease the charge cycles of the battery.

    Using proper cable

    Unrecommended charging cable can damage U2I port on our smartphone. The port is responsible for charging and some other USB function. Improper handling of that port can damage the USB functionality of phone or tablet. Which can lead to the multiple consequences like phone doesn’t charge, phone won’t turn ON, etc. That’s why it is always recommended to use proper USB cable while charging your brand new Android phone or tablet. You can try braided USB cables which has a lot of advantages over regular USB cables.

    Avoid uncertified magnetic charging cables

    I have observed that many people are using un-certified magnetic charging cables. Those charging cables are easy to connect with USB port as compared to traditional USB cables. Always use proper magnetic charging cable. There are some risks to use magnetic USB cables. If device is made up of metallic body then sometimes you have to take care that charging cable and device body doesn’t get shorted.

    Using another Charger

    Always try to use the charger which comes with your phone. It comes with correct rating. While using another third-party charger make sure that it is supported by your phone. Never use low quality and cheap alternatives it may harm your phone or tablet. Many times such cheap chargers catch fire.

    These are some of the things you must do before charging your Phone or Tablet running on Android operating system. It helps you to retain more and more battery life. Still worried about your battery life.

    Thinking to buy Power Bank. Read How to choose right power bank for your mobile.